Directions: Use an ample sized soaking container to re-hydrate your compressed brick. Soak your compressed coir brick for a minimum of fifteen minutes before attempting to use the product.
Start with 2 liters of water per brick (specific to this kit). If your brick is not fully hydrated then add more water.
Once your coconut coir is fully hydrated, add the coir to the non-woven starter bags provided. Make sure to pack each pod gently but firmly. Plant seeds accordingly in each pod.
Keep moist but not in standing water.
We recommend using the pods for your heirloom tomato seeds and direct sow the companion planting seeds. When you're ready to plant your seeds, it is best to only plant 1 or 2 seeds per pod. Too many seeds per pod (image below) will cause seedlings to be overcrowded and possibly not grow as healthy as possible.
The Mountain Flower Compost Tea can be used once your tomato seedlings have their second set of leaves. I recommend using half the packet (1/2 tablespoon) in 1/2 gallon of water for the first feeding. You can dilute even more if you prefer.
New Planting for individual plants, mix 1-2 tablespoons
into soil when planting.
Transplanting: mix 1-2 tablespoons into soil when planting.
Established Plants: Add 2 tablespoons per gallon of water. "Brew" for 12-24 hours and feed 1/4-1/2 gallon per plant
The Nitrogen Boost Fish Food can be used at any time after transplanting. A diluted solution can be used right after transplanting to reduce shock. The smell is very strong so we do not recommend using it indoors.
The second half of the Mountain Flower Compost tea can be used in between or monthly after transplanting.
SEED PLANTING
For tomatoes, you can soak seeds for 24 hours prior to planting but this is optional. Sow approx 1/8-1/4 inch deep into moist soil/growing medium.
For your companion seeds, direct sow in your prepared garden bed, container or plot. These can be inter-planted with your tomatoes.
Borage: Plant seeds 1/8 - 1/4 inch deep into moist soil/growing medium.
Basil: don't plant these tiny seeds too deep. I prefer to place them on the top of the soil and gently tamp down into the soil.
Nasturtium: the seed coats are fairly hard so it would be a great idea to soak these for 24 hours prior to planting. Plant seeds 1/4 - 1/2 inch deep into moist soil/growing medium
Marigolds: Plant seeds 1/4 - 1/2 inch deep into moist soil/growing medium
At Mary's Heirloom Seeds, our goal has always been to help people grow the healthiest garden using heirloom seeds.
Between our free planting guides and youtube videos, we have enough information to help you get started. Sometimes, the getting started part can be a bit overwhelming but we hope this gets you started in the right direction.
Starting a garden from scratch or expanding your garden is super exciting! Before you get started however, there are a few things to consider and "prep."
1. Determine the best time to plant
2. Pick the right spot
3. Prep your chosen spot
4. Plant Seeds!
Let's get started!
Determine the best time to plant...
We offer 2 different planting guides to help you decide when and what to plant. Before you use these guides, find your First and Last frost dates. Your last frost date will be your Spring planting guide and your first frost date will be your Fall guide. Depending on your region, you might be planting indoors 4 to 12 weeks prior to your last frost date.
If you use one of our planting guides then check out "easy" guide. You should have a great starting point to determining when to start your seeds.
Pick the Right Spot
Now that you've determined when to plant, we need to find the right spot. Most veggies need 8 hours of sunlight to thrive. However, some greens only need 4 hours for a decent harvest.
It is important to pick a spot that has good soil. Otherwise, a good spot for raised beds. If you have gophers, moles or voles, growing in raised beds is an excellent option.
A water source is another important factor in choosing the right spot for your garden. If you have to haul water, it will become increasingly difficult to maintain your garden.
A healthy garden also needs good drainage. If you are limited to a specific spot for your garden and it floods or does not drain very well, it would be a good idea to build up and/or use raised beds.
If you are growing in containers, we have a recipe for soil... DIY Potting Soil Mix
If you are starting a garden in a new spot, you might want to have your soil tested first to see what nutrients you might be lacking. A good all around soil amendment (and my favorite) is Mountain Flower Root Boost. It contains macro and micro nutrients to help your plants grow healthy.
If you are using a spot that is overgrown with grass or weeds, a little extra planning is involved. DO NOT treat with weed-killer prior to planting or you are potentially contaminating your future garden space. Anything that kills weeds will kill your garden. Laying down cardboard for a few months to kill the grass is an inexpensive, eco-friendly option.
DON'T GET OVERWHELMED! I know, that's not one of the steps but it's still very important. Starting a garden can be as simple as planting in a bucket or barrel. Or, it can be planting an acre or more. Whatever you decide, it is important to not get overwhelmed and have fun.
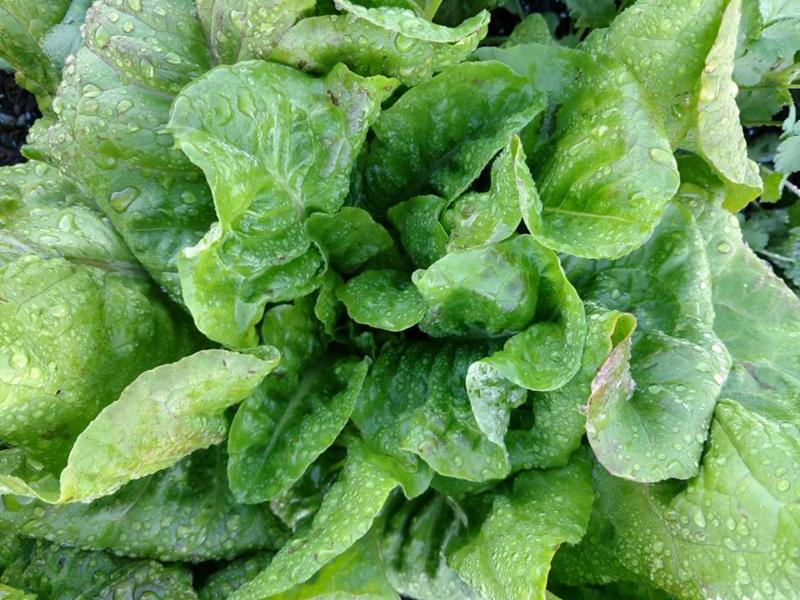
Before you plant those seeds, start by choosing crops that you know you'll enjoy and maybe add a few that you've never tried. I love greens. Seriously, there are no greens that I don't like. Check this out...
Plant Seeds!
Before you plant those seeds, check out our article The Wonder of Seeds and Germination. Most of your every day veggies don't need any special treatment in order to germinate. Soil temp, water and light are important factors to successful germination.
If you are seed starting indoors, you might need to prep a few days/weeks in advance.
Seed/plant spacing is important to take into consideration if you are transplanting or planting seeds. We have 2 guides to help you determine how/where to plant
Patience is one factor not mentioned in most seed starting articles. I often say "It's a garden not a microwave." We must have patience in the garden because nothing is instant.
Growing a Great Garden is a labor of love and requires a bit of work but the rewards are amazing. Below you will find a massive amount of information to help you grow a GREAT garden. As always, if you have questions I am happy to help!
Victory Gardens are making a comeback with an emphasis on sustainable food. Starting a garden is always a great idea so we have a few tips below.
During World War I, Victory Gardens began in backyards, empty lots and whatever space people could find as Americans were called to grow food. Food production had fallen dramatically as agricultural labor joined the military service.
During World War II, the victory garden movement resurfaced. Eleanor Roosevelt planted a victory garden on the White House lawn and Americans were encouraged to “Sow the Seeds of Victory.”
At its peak, it is estimated that nearly 20,000,000 gardens were grown and about 40 percent of all vegetables produced in the U.S. came from Victory Gardens.
Getting started
In my article You Don't need a Farm to Grow Food, I mentioned several ways to grow including growing vertically, in buckets or growing in small spaces.
Growing from seeds allows you to choose unique varieties and grow them according to your area. Choosing heirloom seeds will give the opportunity to save seeds from your harvest to grow more food in the future. Growing from seed and then saving seeds is like printing your own money (only better because you can't eat money)
If this is your first time growing a garden, you might consider easier varieties to grow from seed. EASY CROPS to grow that do not require much space or heavy nutrients include
If you intend to grow enough to preserve for future consumption, don't overlook varieties such as Tomatoes, Cucumber, Dill, Okra, Peppers, Squash, Rosemary and Pumpkin
Know What to Plant and When to plant
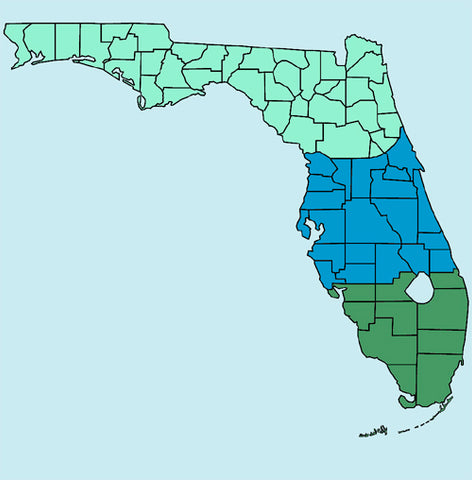
For a successful garden it is important to know when to plant certain crops specifically in your area. Planting in Florida for example will be much different than Colorado.
Our Comprehensive Planting Guide includes 2 fantastic options. One is a Region-Specific Guide and the other is a USDA Zone Specific Planting Guide.
Our Comprehensive Planting Guide also includes seed-specific planting information, DIY garden tutorials, helpful videos and even a few recipes
Depending on your region, you might even be able to grow year round!
Now that we've covered our zone & region specific planting guides, below you will find additional planting info such as plant spacing and growing tutorials.
We will update this list as we add to our youtube channel and articles posted here on our website. If you have specific garden or seed related questions, please contact us via email at MARY@MARYSHEIRLOOMSEEDS.COM
I am often asked about my favorite crops to grow so I thought I'd share. This is the print version from my video Top 10 Homestead Crops
Choosing my favorites is no easy task but I've included a few specific varieties throughout this article that might help you choose. If you have additional questions I'm happy to help!
Cold hardiness and nutrient-rich qualities are why cabbage makes this list. It can stay in the garden late into fall and store in a root cellar or cold greenhouse. Sauerkraut, a fermented food rich in vitamins and probiotics, is a traditional means of preserving cabbage, and your kraut can keep in a crock for months.
Pictured is Pak Choy Cabbage (also called bok choy and pok choy). This is a fantastic, fast-growing variety of Chinese cabbage.
Kale is a superfood that keeps on giving! When growing Kale, you harvest the outer leaves instead of pulling up the whole plant. This allows for multiple harvests of nutrient-dense food.
Lacinato Kale is a good heat-tolerant variety if you live in warmer climates
Collards are cool weather crops but some do very well in warmer climates. Morris Heading and Georgia Green both do well in warmer growing areas.
Greens don't last very long once harvested so you'll need to use them up or preserve them. 2 simple ways to preserve greens are freezing and dehydrating.
Winter squash, rich in fiber and vitamins A and C. Grow ‘Waltham Butternut’ for a pest-resistant, HUGE performer in the garden. Pumpkin and Acorn squash are also homestead favorites and they store very well.
HUBBARB BLUE reaches 16 to 20 pounds. It is also a "trap crop" for companion planting so Hubbard Blue is a must-have in our garden
If stored properly, winter squash and pumpkin can last a few months after harvest making this an excellent homestead crop.
Beans are most definitely a homestead favorite. From our article Feeding a Family from the garden, it is recommended to plant 10-20 plants per person to feed for a year. If you're just looking to add to your food preps, 5 plants or more per person would work
Dry beans, or legumes, are a homestead favorite as they store very well without needed to can them.
Green Beans are easy to grow and can or freeze. If you have a smaller garden space, planting pole beans are an excellent option as they grow UP.
Providing homegrown food for your table is such an amazing thing. Heirloom Corn can be used fresh or dried for future use. Animals can be fed from stored corn making Heirloom Corn one of our top 10.
Flint corn is suited to cooler, wetter climates and is the most difficult to grind.
Flour corn, grown by American Indians in the Southwest, is the easiest to grind.
Dent corn is characterized by the dent in the top of each kernel.
Common field corn is dent corn.
Popcorn is exactly as the name implies. It is used dried for popping.
Sweet corn does not store as well so it should be consumed or preserved after harvest.
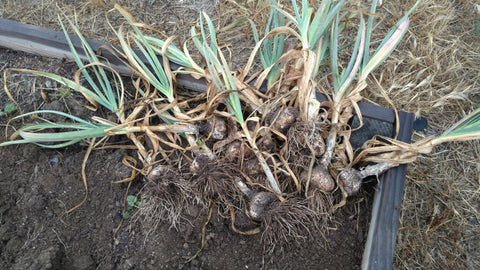
ROOT CROPS: Garlic & Potatoes
I know I mention a few different root crops for homesteading but Garlic and Potatoes are in a category together as they store very well if properly cured. "Seed potatoes" and "seed garlic" is available from most seed companies only seasonally. You can use store bought but you might be exposing your garden to soil born diseases.
Tomatoes can be dried, frozen or canned. They can be made into soups, sauces, pastes and more. They then become the base ingredient in hundreds of kitchen recipes. Tomatoes are one of the easiest veggies to can because they are a high acid veggie and as such, they can be water bath canned instead of needing a pressure canner.
Fast growing, fast maturing and a double duty crop because you eat the root and greens. Easy to pickle and delicious raw. Radish can also be roasted just like mini potatoes. French Breakfast Radish is a more mild variety. German Giant Radish can be eaten small or large. Japanese Daikon is a nice, spicy variety but it takes a couple weeks longer to mature.
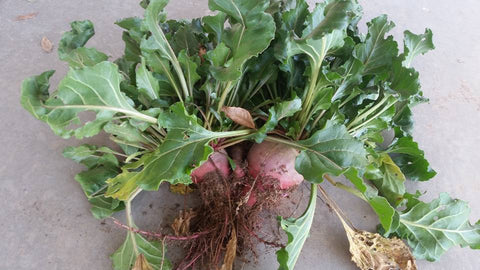
Fast growing, fast maturing and a double duty crop because you eat the root and greens of beets. Depending on your growing region, some gardeners can grow beets year-round.
Detroit Dark Red is definitely a favorite because it's so pest resistant. Red Mammoth Mangel deserves a mention because it can grow 20 POUNDS, making it great to feed livestock
Wheat for those of you not gluten sensitive. Wheat is used to make so many food items such as bread, pasta and pastries.
We carry Einkorn Wheat berries, which is an ancient grain. Some people with gluten sensitivity have had success using Einkorn instead.
BUT...I would say SUNFLOWERS instead on our homestead. We avoid wheat. Sunflowers produce seeds to feed us and our chickens. They also produce A LOT of seeds to grow more. Sunflowers also attract pollinators to our garden to help us grow the BEST garden ever!
Pretty much grow your own pharmacy if you know what to grow and how to dry it. We offer a few seed combo packs like the "In the Kitchen" Herb Garden Kit to help you grow a small herb garden. For your own home apothecary, we have quite a few options. CLICK HERE to see our herb seed combo packs
We offer several articles with our own tips & tricks to seed starting but this one is a bit more in-depth. We start planning and prepping for seed starting when it's still chilly outside.
I like to use Coconut Coir for seed starting. It's easy to use and less acidic than peat moss. Seeds do not need any fertilizer in the beginning stages so it is best not to use compost or treated soil for seed germination.
Coconut Coir Pellets or 6 Cell Germination trays work well for seed starting. Use garden markers to label the seeds you've planted. I hear from SO many gardeners that they forgot to label or lost their labels and they don't know what they planted! We recently posted 2 video to help you get started
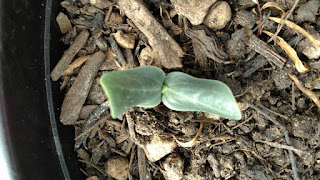
Sowing depth varies, depending on the germination needs of the plant, but generally most seeds are sown at a depth about twice their width. Some seeds require light to germinate and so require sowing on the soil surface. Once depth is determined, sow one to two seeds per pot and mist the soil surface with water so it's evenly moist. Most seeds germinate best at temperatures between 65 and 75 degrees Fahrenheit. Watering when the soil surface feels dry is sufficient, but empty any collected water from the drip tray within 30 minutes of irrigation to prevent soggy soil.
Some seedlings may have to be transplanted into larger pots to give them room to grow and develop their root systems. Handle the baby plants gently by their leaves, not stems or roots, and try to keep the tiny rootballs intact as you move plants to their new pots. When watering seeds, I use either a spray bottle to moisten the soil or pour water into the reservoir so the soil wicks up the water. Heavy-handed pouring can displace tiny seeds so it is best to use caution. Kathryn at Little Bits of Heaven homestead mentioned her secret to avoid "dampening off" in her video Starting the Summer Garden & Cheap Seed Organization and it's cinnamon! We use Cinnamon as well and it definitely helps. Check on your plants once a day Harden off your seedlings prior to transplanting outdoors. Not sure how, we have an article Hardening Off Seedlings If you'd like to check out our very first video on seed starting, it's also on our youtube channel
If you have additional questions please give us a call or email
If you're like me and you're looking to add a few more varieties to your garden that will produce for more than a season, Perpetual Spinach is a fantastic option!
From seed, Perpetual Spinach is usually producing by 50 days. I've had quite a few swiss chard varieties continue to produce for over 9 months so they're well worth the moderate amount of space they use in the garden. Perpetual Spinach is a great container variety as well.
50 days. European heirloom dating back to the 1860s. Belongs to the same species as chard and beets, but it has distinctive differences.
The taste is more like a true spinach than ordinary chard, and the leaves look like spinach too. Pertetual Spinach leaves are flatter and more pointed than chard, with slimmer stems.
An excellent no-fuss warm weather substitute for spinach in the Southeast.
Tip: Soak seeds overnight in water before planting to ensure strong germination.
Plant seeds 1/4 - 1/2 inch deep and 3-6 inches apart. Set out seedlings 8-12 inches apart. Indoors or out, thin newly germinated seedlings with cuticle scissors instead of pulling them out. Chard seed capsules often contain two or more seeds. If more than one germinates snip off all but the strongest sprout at the soil line. Gradually thin direct-sown seedlings to 8-12 inches apart.
Harvest individual leaves from the outer area but be sure to leave the crown intact.
Frequent picking helps to stimulate the production of new leaves. Rinse leaves with cool water immediately, shake off the excess moisture, and store in plastic bags in the refrigerator for up to four days.
Swiss Chard is not only heat tolerant, depending on your area, it is also a cool weather crop. I have had several varieties withstand several days of frost and survive.
Bean, cabbage family, tomato, onion and roses. Don't overlook chard's value as an ornamental plant in flower beds or wherever you have room for it. Don't grow chard near cucurbits, melons, corn or herbs.
Plant seeds 1/4 inch deep in moist soil. It is best to sow lettuce or spinach seeds thinly in rows spaced about 1 ft. apart or simply scatter the seeds in blocks. Cover lightly with soil, firm in place and water well. Keep the soil moist until germination. Once the plants have a grown their true leaves, you can begin to thin the plants to about 6" apart.
Start lettuce or spinach indoors or direct seeded in the garden as soon as the soil is workable. Great for container gardens.
Depending on the type of lettuce, harvest outer leaves only or cut down the whole head. Succession planting can dramatically increase yields, especially in smaller areas. Succession planting is when you stagger plantings in the same area throughout the season. Each time a crop is finished you pull it and plant a new one.
Lettuce and spinach are great options for cold frames if you're growing in a cooler climate. Fertilize 3 weeks after transplanting. Lettuce prefers soil that is high in humus, with plenty of compost and a steady supply of nitrogen to keep if growing fast. Alfalfa Meal or Alfalfa Meal Tea works well for Growing Greens.
Spinach can be harvested in the cut and come again method of harvesting lettuce. Cut individual leaves, starting with the older, outer leaves, and letting the young inner leaves remain and continue growing for a later harvest. You can also cut down the whole plant, for a larger harvest.
Lettuce: Does well with beets, broccoli, bush beans, pole beans, carrots, cucumbers, onion, radish and strawberries. It grows happily in the shade under young sunflowers. Dill and lettuce are a perfect pair. Keep lettuce away from cabbage. Cabbage is a deterrent to the growth and flavor of lettuce.
Spinach: Plant with peas and beans as they provide natural shade for the spinach. Gets along with cabbage, cauliflower, celery, eggplant, onion, peas, strawberries and fava bean. Plant spinach with squash. It's a good use of space because by the time squash plants start to get big the spinach is ready to bolt.
-Make sure soil remains moist but is well drained.
- You should be able to sow additional seeds every two weeks for a continuous harvest throughout the growing season
- Consider planting rows of chives or garlic between your lettuce to control aphids. They act as “barrier plants” for the lettuce
-Lettuce will tell you when it needs water. Just look at it. If the leaves are wilting, sprinkle them anytime—even in the heat of the day—to cool them off and slow down the transpiration rate.
-Weed by hand if necessary, but be careful of plant roots: They are shallow.
If you have additional questions please send an email to mary@marysheirloomseeds.com
If you have warmer days and cold nights, consider planting greens in small containers to bring inside at night. Or, plant an indoor windowsill garden to harvest fresh greens such as European Mesclun Mix and Arugula.
RADISH is an excellent Fall crop. It is easy to grow and a quick harvest!