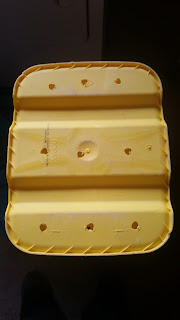
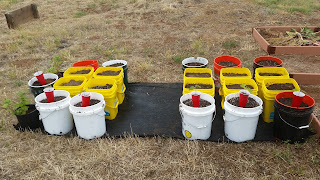
For this project, 100% of the buckets used are recycled. Some of the buckets were from previous projects and the yellow ones once held fresh kitty litter. The white buckets are food grade. The goal of this project to spend as little as possible and still grow food.
 |
| Helpful article: Growing in Containers |
**PLEASE read: We understand that people have concerns about growing in plastic or the use of plastic. Food Grade buckets are available. Our goal for this project is help people grow no matter their space or financial circumstance**
To keep the grass and weeds from growing up inside the buckets, I used landscaping cloth which I already had in the garage. This step is optional. You can lay down cardboard as a weed blocker if you'd like.
We just posted GROWING IN CONTAINERS on our blog if you're interested in What to Plant in containers
We drilled holes in the bottom of each bucket to keep the soil from getting waterlogged. Drainage is important.
When I first started this project, I just filled up the buckets I had available.
I would have saved a lot of time and effort if I had planned out my area with EMPTY buckets. Please feel free to learn from my experience. Map out how many buckets you have and how much space you intend to use BEFORE filling up each bucket.
If you're buying bags of soil, 1.5 cubic feet bag of soil = 11.22 US gallons. That means 1 bag should fill up 2 buckets. If you choose to add perlite or Coconut Coir then you'll need to adjust.
For my buckets, I added composted horse manure to the bottom of each bucket. The manure is FREE from our neighbors. You might be able to find soil and compost free on community forums.
Additional soil amendments include Azomite and Mary's Organic Plant Food. Once seeds are planted and seedlings are transplanted, each bucket will be watered with Endo & Ecto Mycorrhizae Root Boost
Here we have 23 containers. This is a small project at the moment. ***We have several customers that have sent pics of their gardens since posting. Some are growing in 60 and even 100 buckets***
I transplanted 3 tomatoes and 3 beans into the buckets so far and 2 already had mint planted. Next I'll plant SEEDS. Stay tuned for our next update.
We hope you have enjoyed yet another informative growing article here at Mary's Heirloom Seeds. If you have additional questions please ask!
Sign up for our E-Newsletter


8 comments
I just started my container garden. I’m using 5 & 7 gallon grow bags. It’s my first garden so wish me luck.
Love this idea!!❤️
I would not recommend using landscaping cloth beneath the buckets. It prevents the tomato plant roots from going deep into the ground which makes the plant much stronger.
@Debbie, it would be best to use “potting soil” as it is lighter/fluffier than “garden soil.” As I mentioned in the article, if you choose to add Coconut Coir or perlite then you’ll need to adjust accordingly.
As for how many plants, that would depend on what variety of plant. Each variety has a different space requirement. For this project I only planted ONE per bucket
Happy planting!
Hi For us newbies,
What TYPE OF SOIL should we use,
And HOW MANY PLANTS PER BUCKET ?
Hi Mary,
I love this idea so much that I’ve doing it for about 7 years now. I started it when I was living in Brooklyn, NY and my out door space was a roof deck. And like you I used all recycled buckets and as much recycled materials as possible. I was able to grow 4 types of tomatoes, carrots, 2 types of onions, radishes, hot peppers and 3 types of lettuces using all organic materials and heirloom seeds. I also made a point of collecting rain water so I wouldn’t have to use any “virgin” water to water my garden. I too am someone who tries to find new uses for old items and recycle or up-cycle were ever I can. So congrats on you “recycled” planter garden. And good luck with it going forward.
Hi Sandra!
The red cups were recycled as well and contain seedlings. After this picture was taken, I transplanted the tomato and bean seedlings. Transplanting info will be posted in our follow-up.
Thank you!
What is the red cup on top for?