News

How to Create a Container Garden Posted on 20 Feb 17:51 , 3 comments

Welcome to our all-in-one guide to creating a container garden.  There are several articles here at Mary's Heirloom Seeds to help you get started but we thought it would be nice to get everything in one easy to ready article.

*NOTE: at the end of the article, you will see all of the videos mentioned as well as specific heirloom crops and varieties that grow well in containers

Even if you have the space to grow in ground, there are a few benefits to growing in containers. Some of those benefits include:

Saves space

Water conservation

Economical if you're using recycled containers

Mobile gardening - this is a bonus if you are growing in a new space. Sometimes it is best to understand your land prior to putting in a permanent garden.

In our Start A Bucket Garden article we used all recycled buckets.

5 Factors to consider when starting a container garden are:

Soil

Container

Water

Location

Plants/seeds


SOIL

We use our own container garden mix that consists of compost, coconut coir and perlite. If you do not make your own compost, you can probably find local compost.

VIDEO: DIY Potting Soil Mix

A common mistake made in container gardening is using ordinary soil (topsoil/garden soil) in containers. A specialized potting soil mix should give proper moisture control and air for growing roots.


CHOOSING A CONTAINER

A container garden does not nave to be anything fancy unless that is your goal. In our Start a Bucket Garden project, we used all recycled buckets for a more economical approach. We also have a tutorial to use 55 gallon food grade drums. those were AMAZING planters!

VIDEO: How to Make a Planter from a 55 Gallon Drum

Whatever container you choose, it must have proper drainage to grow a healthy plant

bucket with drilled drainage holes


WATER

If you are growing several varieties in a single container, it is important to match their water requirements. Tomatoes for example don't like "wet feet" but watercress thrives in wet conditions.

Depending on your regions and rainfall, you might need to keep a closer eye on the amount of water your containers receive. In Florida, we received so much rain at times, I rarely needed to water (depending on the season). In California, we received very little rainfall so I watered regularly.


CHOOSING A LOCATION

Most vegetables and herbs need 6 to 8 hours of sunlight to thrive. There are a few shade tolerant crops but 6 to 8 hours should be your minimum goal when choosing a location.

I mentioned earlier that "Sometimes it is best to understand your land prior to putting in a permanent garden." Container gardens are a great way to get started with a garden if you aren't sure where you want to start or if you might be moving and need to remove the plants.

Distance to water is another factor when choosing a location. Hauling water to your garden can be extremely difficult so choosing a spot that's close to a hose is a bonus.


SEEDS - more specifically what varieties will grow and thrive in containers.

Most herbs do well in a container. Depending on the size, you might even be able to plant several in one container. Our Rosemary grew very well in a large 10 gallon pot. (yes, Rosemary flowers and the bees love it!)


Depending on the type of container, you can use our Square Foot Garden Plant Spacing Chart to help you decide how many seeds or plants to use in each container.

Eggplant is a great option for containers


Determinate Tomatoes do well in containers


GROWING IN CONTAINERS DOES NOT HAVE TO BE EXPENSIVE!

This is part of a friend's garden


 Ready for a list of specific crops and heirloom varieties that do well in containers?

BASIL - I'm not sure it's possible to grow "too much' Basil. It's easy to start from seed and thrives in a container under the right conditions.

BEANS - Both bush beans and pole beans will grow very well in containers. To make the most of your space, choose a pole bean and add a cage or trellis for your beans.

BEETS - I recommend a longer container than a bucket for beets

Beets and Swiss Chard in a container

CUCUMBERS - Pickling cucumbers and Mexican Sour Gherkin (cucuamelon) are great choices for a container garden.

Those cucumelons are so cute!

EGGPLANT - As mentioned above, Eggplant is great for containers. For a small (tiny) variety we carry Petch Siam. Rosa Bianca and Turkish orange are both very unique varieties while Black Beauty is a staple and prolific producer.

GREENS - pretty much all of the greens are fantastic for a container garden! Swiss Chard is a favorite as it can continue to produce for 9 months (or more) and even produces without bolting in the heat

HEIRLOOM PEAS - I don't think I've met a pea that I didn't like! Whether it's a cool weather pea or a southern pea, both will do well in containers.


PEPPERS - All of the pepper varieties we have grown have done well in containers. These Chocolate Baby Bells were especially delicious!

While you can grow Radishes in containers, I prefer to use the space for more prolific producers. However, if radishes are on your must-grow list and container are your option, you can definitely grow them in containers.

SQUASH & PUMPKINS - I prefer to grow vining squash and pumpkins in ground. Bush Squash and Summer Squash are great options for containers. Benning's Green Tint, Yellow Scallop and White Scallop are fantastic options for a container garden. Lebanese Bush Squash is a unique, heirloom variety that would also grow well in containers.

DETERMINATE TOMATOES - from our article The Wonderful World of Heirloom Tomatoes,

Determinate tomatoes produce the fruit all at once. These are typically bush tomatoes, and make the best tomatoes for container gardening. Since all the tomatoes are ripe within a short period of time, these are great plant choices if you plan to can or have a short tomato growing season.


TOMATILLO - we definitely cannot overlook tomatillos when planning a container garden. They are versatile, easy to grow and thrive in containers.

OKRA - in my experience, growing okra in containers usually means smaller plants (compared to the 6 foot trees we usually grow) but they can definitely thrive in containers.


Ready for a few videos? As promised, below you will find videos we have created over the years about growing in containers.


If you have additional questions, please feel free to ask!
Email: mary@marysheirloomseeds.com
HAPPY PLANTING!


http://www.facebook.com/pages/Marys-Heirloom-Seeds/229833070442449


SOIL Recipes for Raised Bed Gardens Posted on 31 Jan 14:33 , 7 comments

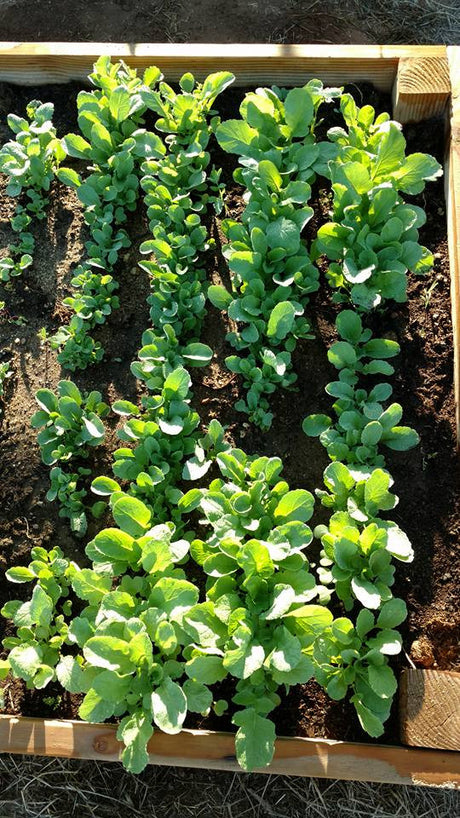
I love our raised bed gardens!!!  There are so many benefits such as less water usage, almost zero weeding and best of all, LOTS of food produced in a small space.

I've had so many questions about what to use for Garden Soil.  The thing is, you can ask all of the "experts" and there is no absolute "right" way.  No one way works for everyone so below you will find some of the recommended recipes for gardens beds.  You'll also find my own recommendations based on what has worked for me.

Vegetable plants need loose, free-draining soil with readily available nutrients to produce abundantly. Each year's crop takes a bit of the nutrient base of the soil with it, so this must be returned on an annual basis to keep the garden productive.  This means adding amendments every year to maintain a healthy balance of nutrients.

First, a caution for the thrifty.  Be wary of advertisements for cheap or free bulk topsoil, as this material is generally scraped from construction sites and may be full of roots and rocks, making it unsuitable planting vegetables. Go to the landscape supply yard and look at the options to make sure you are getting a loose, clean, lightweight material that has compost already mixed in.

If you are building and filling  multiple beds, buying bagged soil isn't economical.  Call around your area and ask for bulk organic topsoil.  You might not be able to find "organic" soil so you can always ask for untreated soil.

1 - 4 foot by 4 foot raised bed takes 16 cubic feet of soil or approx 1/2 a cubic yard of soil

I saw one recipe that called for 1/3 Peat moss, 1/3 vermiculite and 1/3 compost.

This is not a recipe I use.  First, peat moss is on the acidic side.  Coconut Coir is neutral and a more sustainable addition to your garden.  Next, too much vermiculite will keep your soil from retaining moisture and nutrients.

Here's another recipe I found:
  • 3 parts compost
  • 1 part peat moss 
  • 1 part vermiculite

Here's my all time favorite from Rodales:
You want the kind that’s dark, rich, and loaded with microorganisms. Fill your beds with a mix of 50 to 60 percent good-quality topsoil and 40 to 50 percent well-aged compost. Before each new growing season, test your soil for pH and nutrient content. You can buy a kit at most home-improvement stores. If your test shows a need for additional nutrients like nitrogen and potassium, raise levels by working in amendments such as bone meal and kelp. Dress beds with an additional ½ inch of compost later in the growing season to increase organic matter and boost soil health. 

I use my own version of the above recipe.  I add coconut coir to each bed.  Depending on what I'm planting, if it needs lighter soil I'll add a bit of vermiculite.  Most of our beds are fed with our own DIY Organic Liquid Fertilizer Mix

We've been building up our own compost and amending the topsoil we purchased by the truckload several years ago.  If you are just getting started, you might have to shop around for a healthy option.


http://www.facebook.com/pages/Marys-Heirloom-Seeds/229833070442449

Sign up for our E-Newsletter


Build Your Own Raised Beds and GROW! Posted on 31 Jan 13:22 , 9 comments

We're finally updating our Build Your Own Raised Bed tutorial!  Our first post was in 2015 when we moved to our new homestead and built a bunch of 8 foot by 4 foot beds.

We are STILL using these beds but we ended up putting gopher wire on the bottom to keep the gophers out.  We've also adapted this tutorial to make a few 4 foot by 4 foot beds for different projects or just because they were easier to handle.

Many of you have seen our updates on facebook.  We have expanded our growing area over the last week.  This place is HUGE!  We wanted to get growing fast but with the rocky ground (and gophers) at our new homestead, we decided to build raised beds.  Here's how we built...


Tools:
Drill (required)
Circular saw (optional)  
Staple Gun (optional) 

Lumber & Supplies:
We purchased 2"x12"x16' untreated boards
untreated 4"x4" posts-Buy it 8 feet long and have it cut in 1 foot long posts
48" landscaping cloth (optional)
 3" deck screws from a local hardware shop.
It takes 1 and a 1/2 boards to make these 4X8 beds.  
That means 12 boards will make 8 beds.


A few thing I've learned:
Landscaping cloth works to keep the weeds out but NOT gophers.

If you have gophers or other burrowing pests, I highly recommend gopher wire or hardware cloth (it's not actually cloth).  Affix the wire to the bottom of the bed after you build the bed but before you fill with dirt

The 3 inch deck screws can be expensive but they are well worth it

I was told that the 4" post at each corner was overkill but I feel it is worth it.  Our raised beds are in great shape so far!

If you choose to build 4 foot by 4 foot beds, you can purchase pre-cut boards OR buy 1- 2X12X16 and have it cut into 4 foot boards.

If you prefer to make smaller beds then you will need to re-adjust length/quantity of boards. 

Screws: 32 
3 inch "Star Drive" deck screws
*These include a drill bit* 
The 2"x12" board were cut in 4' and 8' pieces.   
The 4"x4" posts were cut in 12" pieces.
If you don't have a circular saw (or want to make the boards easier to handle) I suggest having the people at the shop cut your boards. 
The 12" pieces of 4x4 post were attached  
to the ends of the 2x12x8 pieces with the  
3" deck screws: *4 screws per board per corner* 
32 screws total


After taking the 4' and 8' boards to the garden the 4' and 8' boards were assembled so that the 4' boards covered the ends of the 8' boards with their attached posts. 


This gave the assembled bed a 4'x8' OUTSIDE dimension gopher wire was attached to the bottom

Now, we have pictures of our 4 foot by 4 foot beds!


4 ft by 4 ft bed


4 ft by 4 ft bed with gopher wire


We used a staple gun to attach the gopher wire to each bed
The assembled bed was then placed gopher-wire side down and filled with good, organic soil with plenty of Organic Nutrients added to the beds.

4 X 4 growing Organic Radish


For 4 beds @ 4ft X 8ft we used about
5 cubic yards of soil.
Water the bed once it's filled with dirt and organic plant food.  We added more dirt once the soil compacted a bit.
TIME TO PLANT HEIRLOOM SEEDS!

If you have additional questions about getting started or would like more info please feel free to ask.  As always, I am happy to help.

If you'd like to check out some of our gardening tips, check out our fb page. 

Stay tuned for info on FILLING and maintaining these beds!


http://www.facebook.com/pages/Marys-Heirloom-Seeds/229833070442449

Sign up for our E-Newsletter


Start A Bucket Garden Posted on 10 May 05:58 , 7 comments

Why a "Bucket Garden" you ask?  At Mary's Heirloom Seeds we are dedicated to helping people grow their own food and we understand that Space and funds are often a factor.
For this project, 100% of the buckets used are recycled.  Some of the buckets were from previous projects and the yellow ones once held fresh kitty litter.  The white buckets are food grade.  The goal of this project to spend as little as possible and still grow food.
Helpful article: Growing in Containers
IF you are interested in starting this project and you are going to BUY buckets, I would suggest purchasing the white Food Grade buckets at your local hardware store.

**PLEASE read: We understand that people have concerns about growing in plastic or the use of plastic.  Food Grade buckets are available.  Our goal for this project is help people grow no matter their space or financial circumstance**

To keep the grass and weeds from growing up inside the buckets, I used landscaping cloth which I already had in the garage.  This step is optional.  You can lay down cardboard as a weed blocker if you'd like.

We just posted GROWING IN CONTAINERS on our blog if you're interested in What to Plant in containers

We drilled holes in the bottom of each bucket to keep the soil from getting waterlogged.  Drainage is important.

When I first started this project, I just filled up the buckets I had available.  

I would have saved a lot of time and effort if I had planned out my area with EMPTY buckets.  Please feel free to learn from my experience.  Map out how many buckets you have and how much space you intend to use BEFORE filling up each bucket.

If you're buying bags of soil, 1.5 cubic feet bag of soil = 11.22 US gallons.  That means 1 bag should fill up 2 buckets.  If you choose to add perlite or Coconut Coir then you'll need to adjust.

For my buckets, I added composted horse manure to the bottom of each bucket.  The manure is FREE from our neighbors.  You might be able to find soil and compost free on community forums.
Additional soil amendments include Azomite and Mary's Organic Plant Food.  Once seeds are planted and seedlings are transplanted, each bucket will be watered with Endo & Ecto Mycorrhizae Root Boost

Here we have 23 containers.  This is a small project at the moment.  ***We have several customers that have sent pics of their gardens since posting.  Some are growing in 60 and even 100 buckets***


I transplanted 3 tomatoes and 3 beans into the buckets so far and 2 already had mint planted.  Next I'll plant SEEDS.  Stay tuned for our next update.


We hope you have enjoyed yet another informative growing article here at Mary's Heirloom Seeds.  If you have additional questions please ask!


http://www.facebook.com/pages/Marys-Heirloom-Seeds/229833070442449

Sign up for our E-Newsletter


GROWING IN CONTAINERS Posted on 9 May 19:58 , 2 comments

Even if you have the space to grow in ground, there are many reasons to grow in containers.  A few reasons to grow in containers include

Save water

Save space

Great for small spaces

Economical if you use recycled containers


First, SOIL!  Soil for containers should be lighter and "fluffier" than garden soil.  I like to add Coconut Coir, Humic Acid and Greensand


Additional soil amendments:
Endo & Ecto Mycorrhizae
Organic, Non-GMO Alfalfa Meal
Organic Azomite
Organic Kelp Meal


What is Compost?
Compost is a natural soil amendment/garden fertilizer.  It can be made using kitchen scraps and yard "waste."  Not only does composting save money on expensive fertilizers, it keeps all of the organic "trash" from going into your garbage bins and out of the landfills.  Using compost improves soil structure, texture, aeration and increases the soils water-holding capacity. 
Warning: Everything I read about composting says not to use meat, dairy products or pet waste. Stay away from using lawn clipping if they are contaminated with weed killer or other harmful chemicals.

Do you need to buy a fancy Compost Bin?  Nope!  I use a large "tuff-bin" with holes drilled in the bottom.  I've added kitchen scraps, yard clipping, shredded newspaper and then re-cover.  Every 4-5 days I turn the soil with a shovel to speed up decomposition.  Seaweed is a great activator and is high in nitrogen.

Nitrogen, phosphorus and potassium are produced naturally by the feeding of microorganisms and decomposing waste.  These are essential to a thriving veggie garden.

Tomato seedling in a recycled container

Veggie Varieties that Grow well in Containers

Most vegetable and herb varieties grow well in containers.  Below are a few of the easier veggies for containers.

BEANS:
Bush types are easy and can be prolific producers.  Pole & Runner types will need to be trellised.  If you have a fence to use, place your container approx 6 inches from the fence and let your beans take over!

CABBAGE:
If you've got an area with partial shade, cabbage is a great option.  Smaller varieties such as Nero Toscana (Lacinato Kale), Pak Choy and Dwarf Pak Choy will grow well in Containers.

CUCUMBERS:
Surprisingly easy to grow, cucumbers are a great addition to your container garden IF you keep your eye out for pests.  Aphids love my cucumbers and they like to take over the garden.  Using Diatomaceous Earth BEFORE you find aphids is a great solution.  If you find aphids, a simple soapy water spray and Organic Neem Oil should do the trick.

EGGPLANT:
You can grow just about any eggplant variety in containers.  Smaller varieties such as the Japanese White Egg might grow the best.  I have grown Eggplant both in-ground and in containers successfully.

GREENS:
Seriously, anything lettuce or "greens" will grow VERY well in containers.  Most greens do not require a lot of nutrients and will grow well in sun or partial sun (even shady).

GREEN ONIONS:
The He Shi Ko Bunching Onion is a great container variety.  You can use the small bulb AND the green.

PEPPERS:
One of my favorite container varieties.  Personally, I have had better yield and less pests growing peppers in containers.  Peppers are considered "heavy feeders" and growing in containers allow me to feed accordingly and without wasting.

RADISH:
If you're looking for the easiest veggie to grow, try radish.  The French Breakfast Radish and the Early Scarlet Globe Radish can be ready to eat in as few as 23 days.  One thing to keep in mind, if your radish grows spindly, you might need more calcium in your soil.
Beautiful RADISH!

SWEET CORN:
They require full sun and a fair amount of your premium growing space for what will be a relatively small yield. Growing corn in containers is possible but not necessarily easy.

TOMATOES:
Yes, it is possible to grow tomatoes in containers.  It might not be easy but it's possible!  Good soil, and getting the watering just right is the key to success.  If you're looking for a good compact, heirloom variety, try the Thessaloniki Tomato or a cherry-type such as the Black Cherry or German Lunchbox.

TURNIPS:
Root crops such as beets, radish and turnips require deeper containers than greens but don't let that stop you.  Turnips are delicious and nutritious and are a great addition to your container garden.

HERBS!!!   I have yet to meet an herb that does not do well in containers.  Seriously, most herbs are easy to grow and do VERY well in containers!

All of the varieties listed above (and probably more) will do well growing in containers AND raised bed gardens.  If you have additional questions pleas feel free to ask.

Thanks for stopping by my little spot on the web...Stay tuned for more organic gardening and health related topics.  If you have questions or suggestions please feel free to ask. 


http://www.facebook.com/pages/Marys-Heirloom-Seeds/229833070442449

Sign up for our E-Newsletter