News

Day 14: Let's talk About Poop Posted on 28 May 15:48 , 3 comments

Sometimes it's fun talking about poop.  Seriously, just saying Poop makes some people laugh.  Thank you for joining us for day 14 of our series Grow Your Own Food in 100 days or Less.


As a homesteader or farmer, it's important to plan ahead for poop management and storage if you plan to have animals.  We currently have chickens and one of our neighbors has horses so we have plenty of manure to work with.


Here's our Day 14 Video


To simplify for this post, different manures are either "hot" or "cold."  Hot manures should be composted or aged prior to using in your garden or they can burn you plants.  Cold manures can be tilled directly in your garden.


Cold manures include Rabbit and Goat poop.  Hot Manures include Chicken and pig. Right in the middle are horse, sheep and cow.  Bunny poop is garden gold so if you raise rabbits or you know someone who raises rabbit, this would be a very inexpensive way to add nutrients to your soil right away.

Approximate carbon to nitrogen ratio of some manures
Cow: 25-1
Horse: 20-1
Sheep: 15-1
Swine: 12-1
People: 10-1
Poultry: 7-1


We briefly mentioned humanure in our video.  This is a touchy subject for some people.  We are certainly NOT experts on humanure so we recommend doing your own research before using humanure as fertilizer for your garden.


We've already posted 2 different videos on manure.
The first was one 


And the second one is


We mentioned in our first video not to splash your plants.  This is an important precaution to take.  ALL of the manure we use has been composted or aged.  We also add layers of manure then soil to our beds so the manure does not touch our plants.  Splashing manure water on leaves can burn them but can also spread bacteria and we definitely don't want that.

Using manure in your garden is not a necessity.  There are plenty of non-animal alternatives to feed your plants and boost soil health.  This part of our series is important as it shoes that there are ways to feed your plants using "free" options that might otherwise be thrown away. 

However you choose to feed your plants and build your soil, we've shown that there are quite a few options.

Thank you for joining us for another day of Grow Your Own Food in 100 Days or Less.  If you have additional questions please send an email to mary@marysheirloomseeds.com

Happy Planting!

http://www.facebook.com/pages/Marys-Heirloom-Seeds/229833070442449

Sign up for our E-Newsletter


Day 10 & 11 Using Coconut Coir in the Garden Posted on 23 May 07:30 , 1 comment

Unfortunately, We were not able to post yesterday so today we're sharing our Coconut Coir info for day 10 & 11.  Thank you for joining us for another post in our series, Grow Your Own Food in 100 days or less with Mary's Heirloom Seeds  

We've mentioned a few times about using coconut coir in the garden so today we;re sharing about the WHY and the HOW.  Here's our video we posted yesterday


We use Coconut Coir Pellets sometimes when we start seeds.
 

We use Coconut Coir Bricks when we plant in containers or seed-starter pots.


From Using Coconut Coir in the Garden
"Coconut coir growing medium comes from the coconut's fibrous husk (known as coir) that is bound together by lignin (known as pith). After the husk is immersed in water for 6 weeks, the fiber is extracted mechanically, and the pith is left behind as a waste product and stored in heaps to age. Since the pith comes from the fruit, it is quite naturally rich in nutrients. Coconut coir growing mediums are dehydrated and compressed into a compact form for easy handling. With the addition of water, coir expands to an easy to work with growing medium. 

The addition of water increases the volume 3 to 9 times, depending on the packaging of products. This process results in a 100% organic, biodegradable growing medium, making it a natural and safe growth medium of choice for growers.
1.5 pounds compressed brick
Add water to increase volume 3 to 9 times!
"  Use Coconut Coir in compost or worm bins About Coconut Coir


-Coir improves soil drainage in the bed while also helping to retain moisture in quick-draining soils. Since coir breaks down slowly, much like peat, it creates air pockets in the soil that allow excess moisture to drain away from plant roots. The coir itself holds onto some moisture so the drainage doesn't occur too quickly and the soil doesn't dry out completely. These dual drainage and retention properties allow coir to improve moisture management in both heavy clay soils and dry, sandy beds.  


From Seed Starting With Coconut Coir


Common Seed-Starting Issues

GERMINATION

-Incorrect Temperature. Different seeds have different needs.

-Old Seeds. When properly stored seeds can have a very long shelf life. But the older they get, your germination rate will begin to reduce

-Incorrect Watering. Water in a necessity for all plants. In the germination stage you need to make sure you keep the soil evenly moist. If you water too much, you run the risk of your seeds rotting before they germinate. If you let them dry out, they will either never germinate or die trying!

-Planting Depth/Light. When you plant your seeds pay attention to your planting depth. This is important because if planted too deep you plants could run out of energy before reaching sunlight. Planting too shallow can lead to drying out. Some seeds actually need some light to germinate, so instead of digging them down you just press them into your soil.

MOLD or ROTTING
Dampening off, is probably the most common disease when starting seeds. It’s a fungus that can attack the seeds as soon as they germinate or after the seedling has emerged. You will know this is what killed your seedlings when you notice dark spots on the stem right at the soil level and the seedling topples over and withers away.

-Don't over water

-Provide air movement. A small fan will work

-Nutrients: Use a half-strength, organic fertilizer with tiny seedling. Our DIY Kelp Meal Tea is a great option for tiny seedling. You can use this as a foliar feed as well.


OVERCROWDING
For coconut coir pellets, plant no more than 2 seeds per pellet for small seeds and only one per pellet for larger seeds. If both seeds germinate, do not pull one out.

Pinch off one of the seedlings at the base to remove. This will give the remaining seedling a chance to survive and thrive.

Once your seedlings are strong and roots start to grow out of the mesh, it's time to transplant them into the garden or into your containers.


Thank you for joining us for another day of Grow Your Own Food in 100 Days or Less.  If you have additional questions please send an email to mary@marysheirloomseeds.com

Happy Planting!


http://www.facebook.com/pages/Marys-Heirloom-Seeds/229833070442449

Sign up for our E-Newsletter


Seed Starting with Coconut Coir Pellets Posted on 25 Feb 07:31 , 4 comments

We've shared about Using Coconut Coir in the Garden here in several articles but we've had quite a bit of questions.  Today we're going a bit more in-depth.
 
First, Why do we use Coconut Coir instead of Peat?

Coconut coir growing medium comes from the coconut's fibrous husk (known as coir) that is bound together by lignin (known as pith). After the husk is immersed in water for 6 weeks, the fiber is extracted mechanically, and the pith is left behind as a waste product and stored in heaps to age. Since the pith comes from the fruit, it is quite naturally rich in nutrients. Coconut coir growing mediums are dehydrated and compressed into a compact form for easy handling. With the addition of water, coir expands to an easy to work with growing medium.

Unlike peat moss, which is highly acidic, coconut coir has a neutral pH level. Most garden vegetables and flowers grow best in neutral to slightly alkaline conditions. When you use peat to amend a garden bed, an addition of agricultural lime is often necessary to combat the higher acidity. With coconut coir, limestone isn't necessary unless the soil naturally has a higher pH level. Coir use results in both a monetary and a labor savings, since you don't need to purchase further pH amendments nor work them into the soil.

-Coir improves soil drainage in the bed while also helping to retain moisture in quick-draining soils. Since coir breaks down slowly, much like peat, it creates air pockets in the soil that allow excess moisture to drain away from plant roots. The coir itself holds onto some moisture so the drainage doesn't occur too quickly and the soil doesn't dry out completely. These dual drainage and retention properties allow coir to improve moisture management in both heavy clay soils and dry, sandy beds.

-Peat moss, which coir replaces as a soil amendment, takes centuries to regrow once harvested. Coir is completely sustainable since it is a natural byproduct of coconut harvests, and coconut trees produce new coconuts every year. Using the coir in the garden keeps it out of the landfill where it would otherwise go. Coir can take a century or longer to fully break down in these landfills, so it's more sustainable to use it to improve your garden soil.

Step 1: Take out your Coconut Coir Pellets.  I like to use a large tray

Step 2: Add water to tray and Coconut Coir Pellets.  Using warm water might help them "grow" faster.
Step 3: Add seeds to the hole and gently cover or "squish" coconut coir.

Step 4: Place in a warm sunny place and keep moist.  This is where the real growing happens!

Common Seed-Starting Issues

GERMINATION

-Incorrect Temperature. Different seeds have different needs.

-Old Seeds. When properly stored seeds can have a very long shelf life. But the older they get, your germination rate will begin to reduce

-Incorrect Watering. Water in a necessity for all plants. In the germination stage you need to make sure you keep the soil evenly moist. If you water too much, you run the risk of your seeds rotting before they germinate. If you let them dry out, they will either never germinate or die trying!

-Planting Depth/Light. When you plant your seeds pay attention to your planting depth. This is important because if planted too deep you plants could run out of energy before reaching sunlight. Planting too shallow can lead to drying out. Some seeds actually need some light to germinate, so instead of digging them down you just press them into your soil.


MOLD or ROTTING

Dampening off, is probably the most common disease when starting seeds. It’s a fungus that can attack the seeds as soon as they germinate or after the seedling has emerged. You will know this is what killed your seedlings when you notice dark spots on the stem right at the soil level and the seedling topples over and withers away.

-Don't over water

-Provide air movement.  A small fan will work

-Nutrients: Use a half-strength, organic fertilizer with tiny seedling.  Our DIY Kelp Meal Tea is a great option for tiny seedling.  You can use this as a foliar feed as well.


OVERCROWDING

For coconut coir pellets, plant no more than 2 seeds per pellet for small seeds and only one per pellet for larger seeds.  If both seeds germinate, do not pull one out.  Pinch off one of the seedlings at the base to remove.  This will give the remaining seedling a chance to survive and thrive.
Once your seedlings are strong and roots start to grow out of the mesh, it's time to transplant them into the garden or into your containers.
Take the entire pellet and plant into the garden.  For healthier root growth and to give plants a boost, I add a tablespoon of Azomite into each hole and mix into the dirt before transplanting the coconut coir pellet with growing seedling. I also water with a diluted version of our DIY Kelp Meal Tea when I transplant to help with shock.
 
We hope you have enjoyed our in-depth article about Seed Starting with Coconut Coir.  If you have additional questions, feel free to comment below or send an email to mary@marysheirloomseeds.com

HAPPY PLANTING!

http://www.facebook.com/pages/Marys-Heirloom-Seeds/229833070442449

Sign up for our E-Newsletter


Plant Disease & Prevention Part 1 Posted on 18 Jan 20:12 , 0 comments

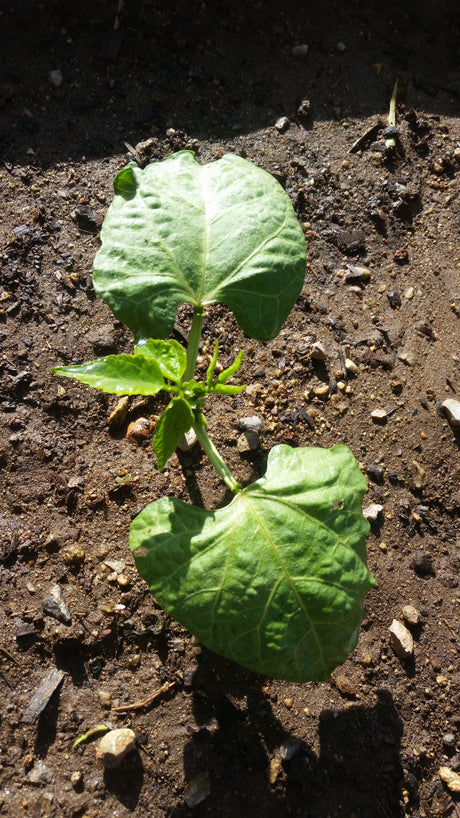
Thank you for joining us at Mary's Heirloom Seeds for another educational article about Growing Food! 

Do you have plants that look sickly or would you like to avoid sickly plants?  Below are examples of plant diseases and how to avoid or cure them in your garden.

From Planet Natural,
"Disease fungi take their energy from the plants on which they thrive. They are responsible for a great deal of damage and are often encouraged by wet weather, poor drainage or inadequate airflow. Plant diseases are characterized by a variety of symptoms, including moldy coatings, wilting, scabs, blotches, rusts, and rot.

Disease info from Garden.org  
(I do not recommend their pesticide suggestions)

Bacterium Wilt
source
This disease occurs over most of the United States. It affects cucumbers and muskmelons and, less commonly, pumpkins and squash. Individual leaves wilt during the heat of the day, but recover overnight initially. As the disease progresses, part or all of the vine wilts and dies. To test for the disease, cut a wilted stem near the base of the plant. Squeeze the sap out of the stem. If it is sticky and white and forms a thread when the tip of a knife is touched to it and drawn away, bacterial wilt is probably present. (This test works best with cucumbers.) The disease overwinters in the gut of cucumber beetles, and is spread to plants as the beetles feed.
Prevention and Control
Controlling cucumber beetles is the key to prevention. Look for varieties of cucumbers and squash that are resistant to cucumber beetles. Cover young plants with floating row covers. Knock, shake, or hand pick beetles off plants and out of flowers, and clean up plant debris to reduce the number of overwintering adults.


Blossom End Rot
Blossom End Rot (BER) is a physiological disorder of tomatoes, peppers, and cucurbits caused by a calcium imbalance within the plant. Fluctuations in soil moisture, excessively wet or dry soil, excessive nitrogen fertilizer, roots damaged by cultivation, very high or low pH, or soils high in salts prevent all can the roots from taking up enough calcium to satisfy the plant's rapid cell development. The result is a water-soaked spot at the blossom end of the plant that enlarges, turning dark brown and leathery. Rot may set in at the spot. BER is common when plants grow rapidly in the beginning of the season, then set fruit during dry weather. As little as 30 minutes of water deficiency at any time can cause BER.
Prevention and Control
Keep plants uniformly watered throughout the season. Water deeply; wet the soil at least 6 inches down. Apply mulch to maintain soil moisture. Keep soil pH around 6.5. Some older varieties of indeterminates (vining tomatoes) and plum tomatoes are more susceptible to BER -- make very sure they have adequate soil moisture.  Read Using Calcium in the garden for Healthy Soil

Early Blight
source
This fungus disease attacks tomatoes and potatoes over most of North America. Plants under stress or with a heavy load of fruit are most susceptible. Dark brown spots with concentric rings in them form on older leaves first. Infected leaves turn yellow and die. Potato tubers are covered with brown, corky spots. Tomato fruits may sometimes be infected; a black, sunken, leathery spot forms at the stem end. Warm, moist conditions encourage disease development. The fungus overwinters in plant residues in the soil.
Prevention and Control
Plant in well-drained soil where air circulation is good. Rotate crops and destroy any volunteer potato or tomato plants. Don't wet foliage when watering. Amend soil with compost, and fertilize plants judiciously to maintain plant vigor. Tomato plants with early blight slowly lose their leaves, but unless the infection is severe, you can usually harvest mature tomatoes.


Powdery Mildew
This fungus disease occurs all over the North America and infects a wide variety of plants, including beans, cucumbers, squash, lettuce, and peas. A powdery white growth covers the upper surface of leaves, which eventually turn yellow and dry. Older leaves are usually infected first. The fungus competes with the plant for nutrients, reducing yields and weakening or even possibly killing it if infection is severe. Fruits and pods may also be covered with mildew. This disease usually develops late in the season on mature plants and thrives in both dry and humid weather. It can spread rapidly.

From a recent facebook post:
"We had a really great question asked recently: "Do you have powdery mildew resistant squash?"

ANSWER: Most varieties (not all) that claim to be "mildew resistant" are hybrids. We offer only heirlooms. There are a number of ways to reduce your risk of powdery mildew
Plant cucurbits in full sunlight. The powdery mildew spores have a difficult time surviving in direct sunlight.

Provide plants with sufficient spacing. Cucurbits need proper spacing to increase air circulation and to help prevent powdery mildew spores from spreading from one plant to the next.

Disinfect any tools after working around cucurbits. If you use a tool around summer squash, for instance, disinfect the tool before working around cucumbers. If the tool isn’t disinfected properly the powdery mildew spores could mistakenly be passed from one plant to the other. Disinfect tools with full strength vinegar or a solution of one part bleach to nine parts water.

Avoid watering cucurbits in the evening. Allowing the leaves to remain damp over night can increase the likelihood of powdery mildew. Water plants in the morning so the leaves have a chance to dry out before dusk. It is better to water the soil around the plants and avoid getting the leaves wet.

If leaves begin showing signs of powdery mildew ( small white or gray spots on leaves) remove the infected leaves from the plant and discard in trash. It is not recommended to place infected leaves in a compost pile."


DIY Powdery Mildew Spray Recipes
One powdery mildew organic remedy is to use dilute solutions of hydrogen peroxide (9 parts water to 1 part hydrogen peroxide). Spray it on the plants thoroughly about once a week. Organic removal of powdery mildew is always preferable to using harsh chemicals on your plants.


Baking Soda Spray 
(I do not use this recipe)
Combine 1/4 tsp. of baking soda with 1 qt. of water in a large bowl.
Stir the mixture to dissolve the baking powder.
Pour the solution into a spray bottle.
Spray the solution on infected plants twice a day to remove the powdery mildew.
For additional DIY recipes and remedies, see our Organic Pest Control articles

If you have additional questions, please feel free to ask!

HAPPY PLANTING! 

 
http://www.facebook.com/pages/Marys-Heirloom-Seeds/229833070442449

Sign up for our E-Newsletter


Using Coconut Coir in the Garden Posted on 28 Sep 18:53 , 3 comments

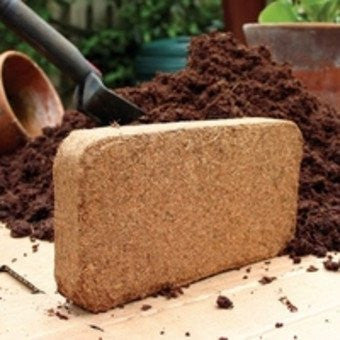
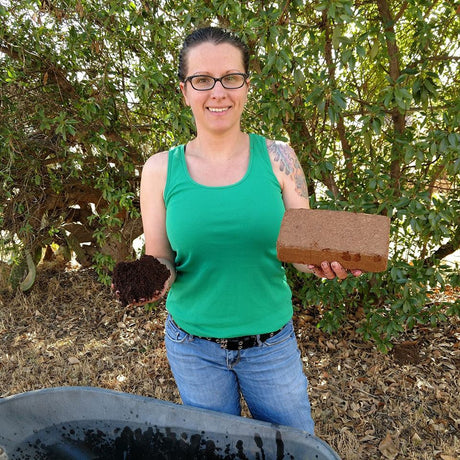
From Mary's Heirloom Seeds,

COCONUT COIR BRICKS
Coconut coir growing medium comes from the coconut's fibrous husk (known as coir) that is bound together by lignin (known as pith). After the husk is immersed in water for 6 weeks, the fiber is extracted mechanically, and the pith is left behind as a waste product and stored in heaps to age. Since the pith comes from the fruit, it is quite naturally rich in nutrients. Coconut coir growing mediums are dehydrated and compressed into a compact form for easy handling. With the addition of water, coir expands to an easy to work with growing medium. 

The addition of water increases the volume 3 to 9 times, depending on the packaging of products. This process results in a 100% organic, biodegradable growing medium, making it a natural and safe growth medium of choice for growers.
1.5 pounds compressed brick
Add water to increase volume 3 to 9 times!


Coconut Coir Bricks: Just add water!

-Unlike peat moss, which is highly acidic, coconut coir has a neutral pH level. Most garden vegetables and flowers grow best in neutral to slightly alkaline conditions. When you use peat to amend a garden bed, an addition of agricultural lime is often necessary to combat the higher acidity. With coconut coir, limestone isn't necessary unless the soil naturally has a higher pH level. Coir use results in both a monetary and a labor savings, since you don't need to purchase further pH amendments nor work them into the soil.

-Coir improves soil drainage in the bed while also helping to retain moisture in quick-draining soils. Since coir breaks down slowly, much like peat, it creates air pockets in the soil that allow excess moisture to drain away from plant roots. The coir itself holds onto some moisture so the drainage doesn't occur too quickly and the soil doesn't dry out completely. These dual drainage and retention properties allow coir to improve moisture management in both heavy clay soils and dry, sandy beds.

-Peat moss, which coir replaces as a soil amendment, takes centuries to regrow once harvested. Coir is completely sustainable since it is a natural byproduct of coconut harvests, and coconut trees produce new coconuts every year. Using the coir in the garden keeps it out of the landfill where it would otherwise go. Coir can take a century or longer to fully break down in these landfills, so it's more sustainable to use it to improve your garden soil.

Coconut Coir Pellets are great for seed starting

If you have additional questions about getting started or would like more info please feel free to ask.  As always, I am happy to help.

If you'd like to check out some of our gardening tips, check out our fb page.


http://www.facebook.com/pages/Marys-Heirloom-Seeds/229833070442449

Sign up for our E-Newsletter


What is Ecto Mycorrhizae? Posted on 1 May 19:42 , 1 comment

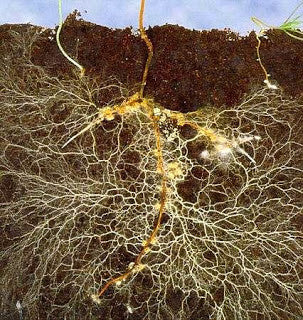
We recently added Endo & Ecto Mycorrhizae Root Boost at Mary's Heirloom Seeds.  Almost immediately I had an email from a customer asking "What the heck is Ecto Myco??"

First, I'd like to answer the question "What is Mycorrhizae?"
The word mycorrhizae (pronounced My-cor-rye-zay) refers to a group of fungi which form a mutually beneficial relationship with many plants. These fungi grow either inside of a plant’s roots or attach to the surface of a root. The fungi benefits from the plant’s food and nutrients and in turn send their hyphae (like small roots) out into the surrounding soil to absorb nutrients and water. So, mycorrhizae actually enhance a plant’s ability to take up nutrients and water. Because of this, research has shown that the presence of mycorrhizae also help plants deal with drought and some diseases. 

LIVE soil with organic soil amendments


Next, lets go over Endo Mycorrhizae.  From our website,
Mary's Root Boost Mycorrhizae is Endo Mycorrhizae which is the type that is beneficial to over 80% of plant species including most leafy green plants and vegetables.
Mycorrhizae is a fungi that has a beneficial relationship with a plants roots. When Mycorrhizal fungi comes into contact with a plants roots it begins to colonize, or multiply, on the roots and begins to spread out into the surrounding soil. These strands of mycorrhizal fungi effectively become an extension of the roots and can increase the absorption area of a plants root system by 10 to 1,000 times. This allows the root system a more efficient intake of nutrients and water.  

Endo Mycorrhizae


NOW for our newest addition at Mary's Heirloom Seeds...a combo!!! Endo & Ecto Myco Root Boost


What's in on Endo & Ecto Mycorrhizae Root Boost?
A Super fine blend of 4 species of endomycorrhizae, 7 species of ectomycorrhizae and nutrient rich humic acids   *Water Soluble*


What is Endo Myco?
Endomycorrhizal fungi (more commonly referred to as endomycorrhizae) is one of the major types of known mycorrhizae which differs from the another type of mycorrhizae, ectomycorrhizae, in structure. Unlike ectomycorrhizae which form a system of hyphae that grow around the cells of the root, the hyphae of the endomycorrhizae not only grow inside the root of the plant but penetrate the root cell walls and become enclosed in the cell membrane as well . This makes for a more invasive symbiotic relationship between the fungi and the plant. The penetrating hyphae create a greater contact surface area between the hyphae of the fungi and the plant. This heightened contact facilitates a greater transfer of nutrients between the two. 


What is Ectomycorrhizae?

"Ectomycorrhizal Fungi are, economically, one of the most important groups of fungi. These are the fungi that form a symbiotic relationship with a plant forming a sheath around the root tip of the plant. The fungus then forms a Hartig Net which means that there is an inward growth of hyphae (fungal cell growth form) which penetrates the plant root structure. There are actually seven types of mycorrhiza and 90% of plants form mycorrhiza with fungi, but ectomycorrhizal refers to this sheath forming type.

The fungus then gains carbon  and other essential organic substances from the tree and in return helps the trees take up water, mineral salts and metabolites. It can also fight off parasites, predators such as nematodes and soil pathogens. Indeed, most forest trees are highly dependant on their fungal partners and in areas of poor soil, could possibly not even exist without them. Thus in forest management, if we do not manage for the mycorrhizal fungi, we could be damaging the trees."


Instructions for Endo & Ecto Mycorrhizae Root Boost: mix 1/2 teaspoon per gallon of water for use as a soil drench for established plants.
SEED SOAK: mix 1/4 teaspoon per gallon of water. Soak tomato and cucumber seeds for 48 hours. Most seeds for 24 hours.


HELPFUL LINKS


Our current email series


Organic Pest Control Series:


We hope you have enjoyed yet another informative growing article here at Mary's Heirloom Seeds.  If you have additional questions please ask!


http://www.facebook.com/pages/Marys-Heirloom-Seeds/229833070442449

Sign up for our E-Newsletter


Using Coconut Pellets for Seed Starting Posted on 16 Apr 07:07 , 4 comments

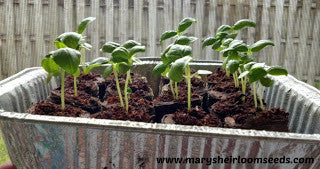
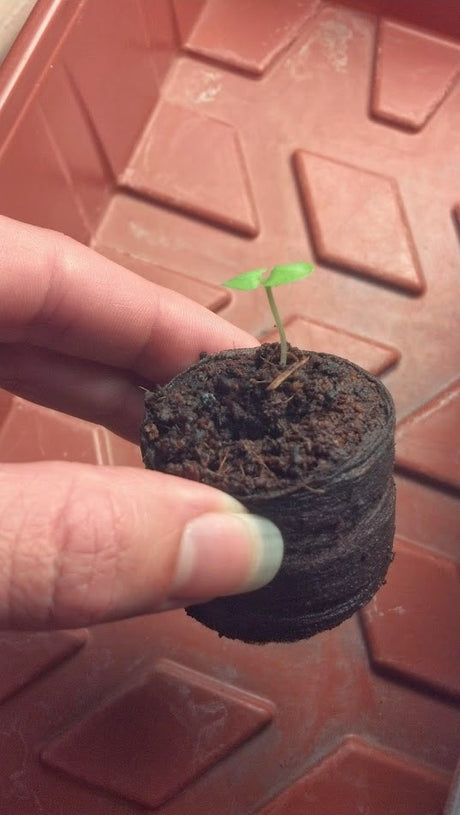
These little pellets are AMAZING!!!
Check out MY results using Coconut Coir pellets.

Step 1: Take out your Coconut Coir Pellets.  I like to use a large tray

Step 2: Add water to tray and Coconut Coir Pellets.  Using warm water might help them "grow" faster.

 Step 3: Add seeds to the hole and gently cover or "squish" coconut coir.

Step 4: Place in a warm sunny place and keep moist.  This is where the real growing happens!

 Below are my PEPPERS growing!  Once the roots start to stick out of the pellet it is time to transplant.  I chose to transplant into a container for now while I care for these peppers.  While they continue to grow I will prepare my garden bed.

About Coconut Coir Pellets: The very best pellet for seed starting!
Add water, and the Coconut Pellets quickly swell to become a perfect self contained pot with its own perfect medium for starting seeds. Seeds are nurtured within the pellet to germinate faster into young seedlings. Roots emerge easily through the porous walls of the pellet as a result of the enhanced air circulation created by the unique design and characteristics.

The Coconut Coir Pellet - complete with the started plant inside - goes directly into the ground. As a result, no transplant shock occurs, and the plant has full vigor to mature faster. All the young, tender roots remain totally intact.   NEW Coconut Coir Pellets are more eco-friendly!

Here's a video we created for youtube.!


There you have it!  Check out Mary's Heirloom Seeds for more information!


If you have additional questions please give us a call or email
MARY@MARYSHEIRLOOMSEEDS.COM 

Happy Planting!


http://www.facebook.com/pages/Marys-Heirloom-Seeds/229833070442449

Sign up for our E-Newsletter


Growing Organic & Regenerative Agriculture Posted on 19 Oct 19:58 , 1 comment

In case you're just finding us, new to our page or missed our previous articles, lately we've been talking about SOIL.
 
We started with The Importance of Living Soil, "Soil organisms, which range in size from microscopic cells that digest decaying organic material to small mammals that live primarily on other soil organisms, play an important role in maintaining fertility, structure, drainage, and aeration of soil."
 
Next in the series is Mycorrhizae: The Fantastic Fungus, "Mycorrhizal fungi include many species of fungi, like mushrooms. They all have long filaments that resemble roots, and they grow near plants with which they can share a beneficial relationship."


At Mary's Heirloom Seeds, growing Organic is what we teach and what we practice in our own gardens.  We realize that many people who read our articles are new to growing food from seed and/or new to growing organic.  For this reason we are going to start with the basics of Growing Organic by explaining what that actually means.

One of my go-to resources for growing organic is the Rodale Institute, founded by J.I. Rodale in 1947.  "Organics is not a fad'" J.I. wrote in 1954. "It has been a long-established practice - much more firmly grounded than the current chemical flair. Present agricultural practices are leading us downhill."

From SARE, "Beginning in the 1940s, Rodale provided the main source of information about "non-chemical" farming methods and was heavily influential in the development of organic production methods. Rodale drew many of his ideas from Sir Albert Howard, a British scientist who spent years observing traditional systems in India. Howard advocated agricultural systems reliant upon returning crop residues, green manures and wastes to soil, and promoted the idea of working with nature by using deep-rooted crops to draw nutrients from the soil" 

Even back in 1954, Rodale warned that the increase in chemical pesticides and synthetic fertilizers were "leading us downhill."

During WW1 and WW2, Victory Gardens were encouraged.  People were told that it was their duty to grow food for their family and for their community because of food shortages around the country.

Now, we have grocery store shelves full of food or food-like products and it seems less people are interested in growing their own REAL, organic food.

A simple explanation of the HUGE savings of growing your own can be found in my article In Times of Uncertainty, Grow & Save.

180 homegrown bunches of Arugula $21

180 store bought bunches of Arugula $358.20

If you save your seeds...The savings are incalculable!


Getting back to Organic gardening, it is defined as not using synthetic pesticides or fertilizers in growing crops.  Ideally, it would also include giving back to the soil, also known as Regenerative Agriculture.

Some of the most common practices of Organic Gardening include:
-Composting
-Creating Pollinator gardens to encourage "Good Bugs" and boost crop yield
-Companion Planting for Organic Pest Control
-Boost root health with Mycorrhizae Use Organic plant food options to nourish plants and soil  

HELPFUL LINKS

Next time we'll talk more about Regenerative Agricultural practices


http://www.facebook.com/pages/Marys-Heirloom-Seeds/229833070442449

Sign up for our E-Newsletter


Mycorrhizae: The Fantastic Fungus Posted on 14 Oct 21:51 , 0 comments

I mentioned in my last article The Importance of Living Soil that I've been reading more and more about soil and soil organisms.  I've known about Mycorrhizae for a long time but we've just now added it to Mary's Heirloom Seeds to help YOU grow a bigger, more productive garden.
  From our website,

Why should everyone use mycorrhizae?
Mary's Root Boost Mycorrhizae is Endo Mycorrhizae which is the type that is beneficial to over 80% of plant species including most leafy green plants and vegetables. 


Mycorrhizae is a fungi that has a beneficial relationship with a plants roots. When Mycorrhizal fungi comes into contact with a plants roots it begins to colonize, or multiply, on the roots and begins to spread out into the surrounding soil. These strands of mycorrhizal fungi effectively become an extension of the roots and can increase the absorbtion area of a plants root system by 10 to 1,000 times. This allows the root system a more efficient intake of nutrients and water.  


They are particularly effective for agricultural plants that have high water and nutritional needs.  Over 50,000 University studies have highlighted the benefits of mycorrhizal colonization on the health and yield of plants. 

Benefits Include:
Reduces Drought Stress
Reduces Watering
Reduces Transplant Shock
Increases Yields
Increases Overall Plant Hardiness
Promotes Rooting
Promotes Nutrient Uptake


Here's what I found from the experts

What is Mycorrhizae?

Mycorrhizal fungi include many species of fungi, like mushrooms. They all have long filaments that resemble roots, and they grow near plants with which they can share a beneficial relationship. They seek out plants that have tiny bits of food dripping from their roots. They then attach themselves to the plant and extend their filaments into parts of the surrounding soil that the plant can’t reach.
A plant would soon exhaust its small area of surrounding soil of nutrients, but with the help of mycorrhizal fungi, plants benefit from nutrients and moisture found further from home. In addition, they produce glomalin, a glycoprotein that helps stabilize the soil.
Not all plants respond to mycorrhizae. Vegetable gardeners will notice that their corn and tomatoes thrive when there are mycorrhizal fungi in the soil, while leafy greens, especially members of the brassicas family, show no response. Spinach and beets also resist mycorrhizal fungi. In soil where these resistant plants grow, the mycorrhizal fungi eventually die out.  Source

From Dr. Davies Research Page


Benefits of Mycorrhiza:
·  Enhanced plant efficiency in absorbing water and nutrients from the soil.
·  Reducing fertility and irrigation requirements.
·  Increased drought resistance
·  Increased pathogen resistance/protection.
·  Enhancing plant health and vigor, and minimizing stress.
·  Enhanced seedling growth.
·  Enhanced rooting of cuttings.
·  Enhanced plant transplant establishment.
·  Improved phytoremediation of petroleum and heavy metal contaminated sites.
Advantages of Mycorrhiza:
·  Produce more stress resistant plants during production and for landscape.
·  Potentially less pesticide usage.
·  Plants are more drought and nutrient tolerant in the landscape.
·  Potentially higher transplanting success and faster establishment.
·  Value added: Marketing landscape plants with greater stress tolerance.


 If your garden soil and veggie garden could benefit from the above, Check out Mary's Root Boost now available at Mary's Heirloom Seeds.

Below are some examples we found of studies showing the effects of Mycorrhiza

Potatoes from SYMYC (above)

Plant Roots from Morrill (above)

More plant roots from Of Mycorrhizae (above)


http://www.facebook.com/pages/Marys-Heirloom-Seeds/229833070442449

Sign up for our E-Newsletter


The Importance of Living Soil Posted on 12 Oct 17:44 , 0 comments

Every day is a new opportunity to learn and grow.  Lately I have been fascinated with Soil and all of the living organisms found in the garden.

Here's what I've found from the experts...

From Organic Guide,
"The life sustaining ability of soil is best understood by appreciating the complex cycles of decay and erosion. Its natural formation occurs in a series of layers starting at the surface but gradating down to the deepest bedrock. The surface layer is where active decomposition begins. Exposure to atmospheric elements, surface warmth and moisture helps to break organic matter into loose mulch like material. At the microscopic level, this layer is teeming with a diversity of bacterial, fungal and algal life forms. In combination with larger organisms like beetles and worms they provide the additional recycling activity to enable minerals and nutrients to be retrieved from the decaying organic matter and returned to the soil. Another family of soil based micro-organisms are involved in relationships that enable plants to absorb nitrogen from their roots.
Ideally the layer directly beneath the surface will be humus rich topsoil. The quality of this topsoil will depend on the amount of organic material available near the surface and the activity of the recycling organisms."


Your soil is ALIVE!!!

From Britannica,

"Soil organisms, which range in size from microscopic cells that digest decaying organic material to small mammals that live primarily on other soil organisms, play an important role in maintaining fertility, structure, drainage, and aeration of soil. They also break down plant and animal tissues, releasing stored nutrients and converting them into forms usable by plants. Some soil organisms are pests. Among the soil organisms that are pests of crops are nematodes, slugs and snails, symphylids, beetle larvae, fly larvae, caterpillars, and root aphids. Some soil organisms cause rots, some release substances that inhibit plant growth, and others are hosts for organisms that cause animal diseases.
Since most of the functions of soil organisms are beneficial, earth with large numbers of organisms in it tends to be fertile; one square metre of rich soil can harbour as many as 1,000,000,000 organisms."


From Colorado State University,


Directly Beneficial Soil Organisms

Some soil organisms have a close, mutually beneficial (symbiotic) relationship with plants. Two examples include rhizobia and mycorrhizae.
Rhizobia are bacteria that form symbiotic associations with legumes such as beans and peas.  The bacteria form nodules on the roots of the host plant in which they fix nitrogen gas from the air.  Rhizobia supply the plant with nitrogen and in turn the plant supplies the bacteria with essential minerals and sugars.  It may be helpful to add Rhizobia in the first planting of beans and peas in a soil area.  Afterwards they will be present.
Mycorrhizae are specific fungi that form symbiotic associations with plant roots.  Found in most soils, they are very host-specific (i.e., each plant species has specific species of mycorrhizae associated with it).
The Latin word mycor means fungus and rhiza means root. The terms “mycorrhiza” (singular) or “mycorrhizae” (plural) refer to the tissue that forms when fungi and roots develop a mutually beneficial relationship. Enlarging the surface-absorbing area of the roots by 100 to 1,000 times, mycorrhizae create filaments or threads that act like an extension of the root system.  This makes the roots of the plant much more effective in the uptake of water and nutrients such as phosphorus and zinc. In exchange, the fungus receives essential sugars and compounds from the roots to fuel its own growth. Some species of mycorrhizae can be seen on roots, while most are invisible to the naked eye.
Mycorrhizae improve plant health. They enhance the plant’s ability to tolerate environmental stress (like drought and dry winter weather) and reduce transplant shock.  Plants with mycorrhizae may need less fertilizer and may have fewer soil-borne diseases.
A by-product of mycorrhizal activity is the production of glomalin, a primary compound that improves soil tilth.  In simple terms, glomalin glues the tiny clay particles together into larger aggregates, thereby increasing the amount of large pore space, which in turn creates an ideal environment for roots.  

Indirectly Beneficial Soil Organisms

In addition to directly beneficial organisms such as rhizobia and mycorrhizae, there are a large number of soil organisms whose activities indirectly help plants.  Soil organisms collectively decompose organic matter, resulting in two principal benefits.
First, as soil organisms decompose organic matter, they transform nutrients into mineral forms that plants can use; thus this process is called mineralization.  Without soil microorganisms, insects, and worms feeding on organic matter, the nutrients in organic matter would remain bound in complex organic molecules that plants can’t utilize.  
Second, as soil organisms break down organic matter, their activities help improve soil structure.  Improved soil structure provides a better environment for roots, with less soil compaction and better water and air movement.  Many gardeners know that organic matter improves soil, but it is important to note that its beneficial properties are only released after being processed by soil organisms.
Soils naturally contain these decomposers. Adding decomposers to the soil or compost pile is not necessary.  Rather nurture them with food (organic matter) and good aeration and drainage (air and water).


I hope you've enjoyed our all of the information I have compiled so far.  Are you growing your own food?  Without a doubt, healthy soil is essential for healthy crops!


http://www.facebook.com/pages/Marys-Heirloom-Seeds/229833070442449

Sign up for our E-Newsletter