News

Making Seed Balls Posted on 28 Apr 06:54 , 3 comments

Last week I had another amazing opportunity to volunteer at one of my favorite schools.  The Sage School Garden invited Mary's Heirloom Seeds back for Earth Day Celebration and my station was making Seed Balls.  However, we didn't "just" make seed balls.  Before each class, I gave a short explanation of the importance of planting for pollinators.

Fun fact: 1 in every 3 bites you eat required pollination from a honey bee. source
Honeybees aren't the only pollinators.  Just as important but not really discussed are birds, bumblebees, ladybugs, hummingbirds and even the wind (to name a few)

Planting for pollinators can increase crop yields in your garden so we recommend adding a few extra seeds to your garden or around your garden.


I enjoy volunteering and teaching.  This was AWESOME! So awesome that I plan on doing this again with my sister and her kids for our garden.  These will be great for our Pollinator Protection Patch.

"An Ancient Method of No-Till Agriculture"
The rediscovery and popularization of seedballs (or “Clay Dumplings” as he called them) in modern times is typically ascribed to Japanese natural farmer and philosopher Masanobu Fukuoka.

As with many natural farmers, Fukuoka believed that tillage over large areas is laborious, destructive to soil health, and ultimately not needed and thus a waste of time and energy. Thus, seedballs have become an important aspect of many natural farming and conservation enterprises around the world.


Learning how to make seed balls is a fun activity for kids. It’s easy to do and can be easily adapted to your region. The seed ball recipe can be altered simply by changing the ratio of ingredients and/or seeds.

Ingredients:
potting soil
clay powder
water
seeds
large tray to mix ingredients
box to store seed balls

Directions:
I've seen different ratios of soil and clay so feel free to adjust depending on your ingredients

Start with 2 cups of potting soil, 1/2 cup clay powder, seeds and 1 cup of water.  Add more water if your mix doesn't stick together.

We used the Butterfly garden Mix seed pack for this first batch


 ALL of the kids in my 6 classes had a chance to get their hands dirty making seed balls to take home!


To make it easy for them to transport, we stapled the instructions to small bags for them to take home.  A cardboard box would be better to store them in but that wasn't possible this time around.  Funny thing happened to my seed balls.  I forgot to take my "sample" seed balls out of my go-bag from the event.  About 5 days later I opened it up to prep for my next school volunteer day and the seeds had SPROUTED!!


When you're ready to plant your seed balls, don't bury them.  You can place them carefully over the area to be planted or you can gently toss them one at a time.  From there, Mother Nature will take over!


I hope you have enjoyed another educational article.  If you have additional questions, please leave a comment below or send an email to mary@marysheirloomseeds.com

http://www.facebook.com/pages/Marys-Heirloom-Seeds/229833070442449

Sign up for our E-Newsletter


Pollinator Protection Patch Posted on 11 Apr 11:36 , 1 comment

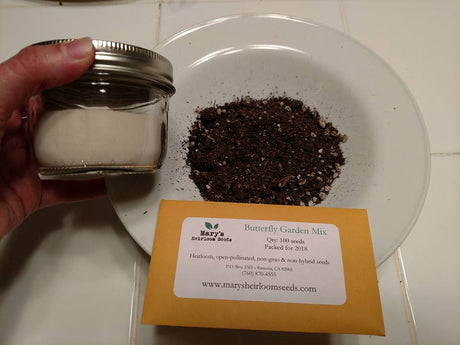
This might be one of our most exciting projects ever!  We are thrilled to dedicate this huge patch of the property for the pollinators that visit our veggie gardens.

 This patch is approx 30 ft by 130 ft!


What is a Pollinator Protection Patch?

This is our Pollinator sanctuary.
Pollinators require two essential components in their habitat: somewhere to nest and flowers from which to gather nectar and pollen.
We've shared about the Million Pollinator Garden Challenge in the past.  This is our way of expanding on that idea while expanding our pollinator garden.


Why are we planting for Pollinators?

There are hundreds (probably thousands) or articles available online about the importance of pollinators for crop production.
One recent concern a customer mentioned to us was blossoms forming and then falling off their squash plants.  In this case, the issue is most likely a lack of pollination.

You don't have to plant a large area to successfully attract pollinators to your garden.  It can be done by simply interplanting flowers and herbs in your current garden or setting aside a place dedicated to pollinator friendly plants.

We have decided to dedicate this large of a space because we are fortunate to have the extra room.  Most importantly, we do not use chemicals or sprays that would harm pollinators on ANY part of the property.


What are we planting in our

Pollinator Protection Patch?

This was a tough decision because honestly I wanted to plant ALL of the flowers!

First, we're starting with a
region-specific wildflower mix


A few other pollinator-friendly varieties we're planting include:


An annual, lemon flavored variety. Superb tea plant; striking pink-purple flowers, beautiful and tasty.


The flavor of Borage is similar to a cucumber.  Borage has bright blue, star-shaped flowers that explode in a blue profusion all summer attracting honey bees.


Sunflowers are easy to grow and hardy plants


COSMOS


LUPINE, WILD PERENNIAL


ZINNIAS

Specifically Zinnia Mix because I love the colors!


We might add a few others as this project progresses such as Purple Coneflower.  Stay tuned for updates!


I hope you have enjoyed another educational article.  If you have additional questions, please leave a comment below or send an email to mary@marysheirloomseeds.com

http://www.facebook.com/pages/Marys-Heirloom-Seeds/229833070442449

Sign up for our E-Newsletter