News

Preserving Garlic Posted on 24 Dec 09:05 , 1 comment

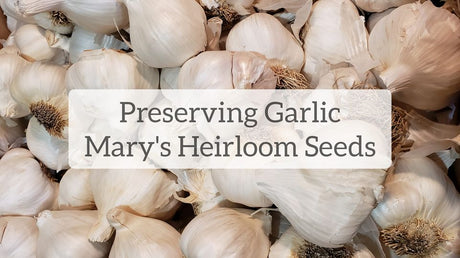
Earlier this year during a live chat we discussed different ways to preserve garlic.

It is important to mention that after you harvest garlic from your garden, it is important to properly cure it before storing. If you're not sure, please read Harvesting & Curing Organic Garlic.


There are quite a few options to preserve your garlic. My favorite is freezing with herbs and oil. Another option is dehydrating. Below is a recap from the video and a link to the video.

If your garlic is dirty from the garden, peel off the outer papery husk prior to getting started. I usually do this outside so I'm not bringing in too much dirt into the kitchen. The extra papery part of the bulbs can be tossed into the compost.

Before you use any preservation method, it is important to clean your garlic cloves well.

Ways to Preserve Garlic:
Refrigerator Pickled Garlic
Dehydrator
Freeze Dry
Mix with Oil and freeze
Freeze whole cloves


Ready for my recipes?

Refrigerator Pickled Garlic

*This is not a shelf stable recipe* The National Center for Home Food Preservation states that the garlic and vinegar mixture may be refrigerated for up to 4 months. 

Brine recipe:

1/4 cup canning salt or sea salt

5 cups white vinegar

2 pounds fresh garlic peeled

2 cups fresh dill

Combine canning salt and vinegar in a large saucepan. Bring to boil; reduce heat and simmer 10 minutes (180 degrees). Meanwhile, pack garlic into 4 sterilized pint jars (about 8 ounces per jar) leaving 1/2-inch of headspace. Add 1 dill to each jar.


Oil & Herb Garlic Cubes

This is an easy recipe and only requires a blender. You can use just oil and garlic or add any herbs you'd like. Keep in mind that this is a very strong (concentrated) garlic recipe so you'll want to adjust accordingly when you defrost.

Ingredients:

2 cups garlic cloves

2 cups olive oil (or avocado oil)

1 cup water

1 teaspoon sea salt

herbs of your choice (fresh from the garden oregano, Rosemary and thyme is my favorite combination)

Add all ingredients to your blender and blend until smooth.

Pour the mixture into ice cube trays and freeze. Once the cubes are fully frozen, remove and store in a freezer safe container.


How do you like to preserve your garlic?


If you have additional questions, please feel free to ask!
Email: mary@marysheirloomseeds.com
HAPPY PLANTING!


http://www.facebook.com/pages/Marys-Heirloom-Seeds/229833070442449


Food Storage Prepping in the Garden: Beans Posted on 25 Feb 04:50 , 3 comments

Welcome to another installment in our Food Storage Prepping in the Garden series.

Today our "crop talk" is beans. Specifically, dry beans.

As I mentioned in the beginning of our series, we are focusing on crops that can be grown and stored without the extra step of canning or dehydrating. *If you want to store ready-to-eat_ beans you will need to add the extra steps*

Dry Beans are easy to grow and store.


From our article, Growing Beans from Seed:

For the sake of simplicity, I classify beans in 2 categories: Bush and Pole.

"Bush beans are usually compact and grow close to the ground. Pole beans climb and require a trellis or other support. Bush beans tend to produce more beans in a shorter time, while pole beans will produce more over an entire season. Pole beans typically require much less garden space since they grow UP."

From there, you have the stage in which a bean is eaten, snap beans & dry beans.

Snap beans are eaten fresh when the pod is still tender and edible. Dry Beans are eaten after the pod and bean have fully dried. Dry beans are also called “shelling beans”.

From seed to harvest, dry beans are ready in 70 to 100 days depending on the variety.


Fresh snap bean (left), dry bean pods (right)


Harvesting dry beans is a very easy process. You can use your fingers to pull the pod apart and the seeds/beans usually spill right out. It would be helpful to use a large bowl to collect your bounty.


Storing your Dry Beans

If you have a collection of recycled jars, this is a great way to use them. There is no canning required for storing dry beans in their dry state.

Officially, dried beans have a minimum shelf life of one to two years, per the USDA. For me, I might be a bit of a rebel here but I definitely store them for longer. Proper storage is important..


Jars should be kept in a cool, dark location. A cabinet or closet indoors works well. Be sure to label your jars so you know what you are storing.

It's that easy!


If you have additional questions, please feel free to ask!
Email: mary@marysheirloomseeds.com
HAPPY PLANTING!


http://www.facebook.com/pages/Marys-Heirloom-Seeds/229833070442449


Food Storage Prepping in the Garden: Amaranth Posted on 18 Sep 12:41 , 1 comment

Have you enjoyed our Prepping in The Garden series so far?

As promised, we are adding a "print" version of our videos on our blog and including growing information for each topic. Today we're sharing about Amaranth.


Amaranth is a heat tolerant crop that can be grown for it's leaves as well as seeds. From seed to harvest, you can begin harvesting leaves as early as 30 days. To harvest seeds, it can take 90-110 days (sometimes longer).

This is one of the varieties that I consider a "double duty crop" since you can use both the leaves and the seeds. The young leaves are delicious eaten raw or cooked. The larger leaves, I prefer to cook. You can prepare amaranth leaves the same way you would spinach and/or collards.

The seeds are cooked similar to quinoa or rice. We will have a seed harvesting video available very soon.


Growing Amaranth from Seed

Amaranth seeds are very tiny so they should be sown just barely under the soil. I have even "tossed" a packet of seeds onto the soil at times and the seeds have germinated very well. Soil should be moist but not waterlogged for optimal germination. Once planted, Amaranth seeds germinate in 3 to 10 days. These heat tolerant plants are very hardy but I still prefer to direct sow instead of transplant.

Amaranth thrives in full sun and while it can tolerate periods of drought, it is best to keep the soil watered.

One good feeding of a liquid fertilizer such as Mountain Flower Compost tea is recommended during the earlier stages of growth. Otherwise, this beauty does not require much more than sun and water. Hot weather is a bonus!


Harvesting Amaranth

As we showed in the video, harvesting leaves from Amaranth plants is very easy. A small pair of scissors or a snip with your fingernail works.

The leaves are quick to perish after harvesting so you'll need to preserve them right away. They can be blanched and frozen for future use or dried to store in a jar. If you choose to dry them, make sure they are fully dried out prior to storing.

When the seed heads are ready to harvest, that's the more tricky part. Wait until the seed heads are very mature and almost dry to harvest.

Cut the entire seed head and hang to dry over a tray or tarp to collect any seeds that might fall.

To collect the seeds, rub your hands over the seed head or gently shake.

Store seeds in an airtight container for future use.


FOOD STORAGE PREPPING IN THE GARDEN (on the blog)

Food Storage INTRO

Food Storage Prepping in the Garden: COWPEAS

FOOD STORAGE PREPPING IN THE GARDEN (videos)

Food Storage INTRO

COWPEAS

AMARANTH

If you have additional questions, please feel free to ask!
Email: mary@marysheirloomseeds.com
HAPPY PLANTING!


http://www.facebook.com/pages/Marys-Heirloom-Seeds/229833070442449


Food Storage Prepping in the Garden: Cowpeas Posted on 14 Sep 04:35 , 0 comments

Welcome to our prepping in the garden series!

Cowpeas are a very easy crop to grow and store. If you're look for a heat tolerant, fast maturing food crop, Cowpeas are a great option.

First, what is a cowpea?

Cowpea, (Vigna unguiculata) also called black-eyed pea or southern pea, annual plant within the pea family (Fabaceae) grown for its edible legumes.

If you live in a frost-free region, you can grow cowpeas almost year round. Otherwise, plant cowpea seeds after your last frost date.

Cowpeas also make a great cover crop. Video: COVER CROPS

They grow upright and spreading, and as a legume, they provide a good source of nitrogen. Their deep taproot is good for soil penetration and enhancing soil tilth.


Growing Cowpeas from Seed to Harvest

Direct sow cowpea seeds after your last chance of frost. Plant seeds 1 inch deep and 6 inches apart. Keep soil moist but not waterlogged. Seeds germinate in 7-10 days (sometimes less). Cowpeas grow well near corn, strawberries and cucumbers, but do not plant them near fennel or onions. 

Cowpeas thrive in direct sun and while they are heat tolerant, it is good to water frequently. Some cowpeas can take 80 days to mature. However, it is our experience that Purple Hull Pinkeye Cowpeas can start to produce in as few as 55 days from seed.

Harvesting Cowpeas

Cowpea pods can get up to 6 to 10 inches in length and look similar to green beans. Pods can be harvested when they’re young, as well as when they’ve dried. If harvesting while green, pick the pods when they are very young. To harvest dry cowpea pods, pick after the pods have dried on the vine.

Fresh beans can be cooked and eaten or frozen. Dried peas can be stored in jars or food storage containers for future use. 

As an added bonus, cowpea plants are an excellent source of organic matter. When the plants are done producing, add them to your compost pile. This could be considered another "double duty crop" since you can eat the produce from the plant and then feed your future gardens!


FOOD STORAGE PREPPING IN THE GARDEN (on the blog)

 Food Storage INTRO


FOOD STORAGE PREPPING IN THE GARDEN (videos)

Food Storage INTRO

COWPEAS

If you have additional questions, please feel free to ask!
Email: mary@marysheirloomseeds.com
HAPPY PLANTING!


http://www.facebook.com/pages/Marys-Heirloom-Seeds/229833070442449


Food Storage Prepping in the Garden: Intro Posted on 4 Sep 04:45 , 3 comments

Welcome to Food Storage Prepping in the Garden!

We have a few very important videos coming soon but today is just an intro.  I will be sharing info on specific crops to grow for food storage and sharing WHY I recommend them. I have been meaning to share something like this and was prompted by a customer email and a video from Elbon Mills Farm


First, the customer email: I'm looking to gather up some of the last supplies for Emergency prep. Can you put together whatever you think would be ideal. To have on hand for a mix or short and long term prep?

I saw your homestead package that looked great.


Answer: Our Homestead pack is perfect for both long term and short term.  For example, Asparagus and Artichoke need 1 to 3 years to establish while the greens can be planted and harvested in 30-60 days.

 Also, we have a 10% discount code for 2021 on all seed combo packs 

Homestead Seed Collection

Garden Starter Pack (easy to grow and a great value)

Mary's Salad Greens (fast maturing and easy to grow)

Rainbow Garden Pack (a good selection of veggies to harvest in 60-100 days)

Culinary and Medicinal herbs are also a great choice for a prepper garden. We have 2 in particular that are customer favorites

"In the Kitchen" Herb Garden

Herbal Tea Garden Seed Combo Pack


Outside of combo packs, there are a few crops that I call "double duty crops" because they are versatile. 

Here comes the IMPORTANT PART...having a stockpile of seeds but not knowing how to use them is not ideal.

If you are prepping for any reason, you should understand the seed, plant and storage of your collection. I have been up front on many occasions that the "survival seed packs" that claim they last indefinitely give people a false sense of security.

First, because seeds have a shelf life. Second, because if you aren't growing in good times, it's gonna be harder in rough times.

I have an article I wrote in 2017 about 15 Survival Seeds to Stockpile. Some seeds like parsnips have a very short shelf life. Some seeds like Tomatoes have a much longer shelf life. STORAGE is so important. Moisture, light and temp can degrade seed quality. If you are new to gardening, start with EASY and veggies that you like to eat

If you are not new to gardening, Choose varieties that did really well for you.

Elbon Mills mentioned Royalty purple podded beans because they were easy to grow and easy to pick because the stand out on the plant.

I hope you enjoyed our Intro to Food Storage Prepping in the Garden. Stay tuned for more!


If you have additional questions, please feel free to ask!
Email: mary@marysheirloomseeds.com
HAPPY PLANTING!


http://www.facebook.com/pages/Marys-Heirloom-Seeds/229833070442449