News

SOIL Recipes for Raised Bed Gardens Posted on 31 Jan 14:33 , 7 comments

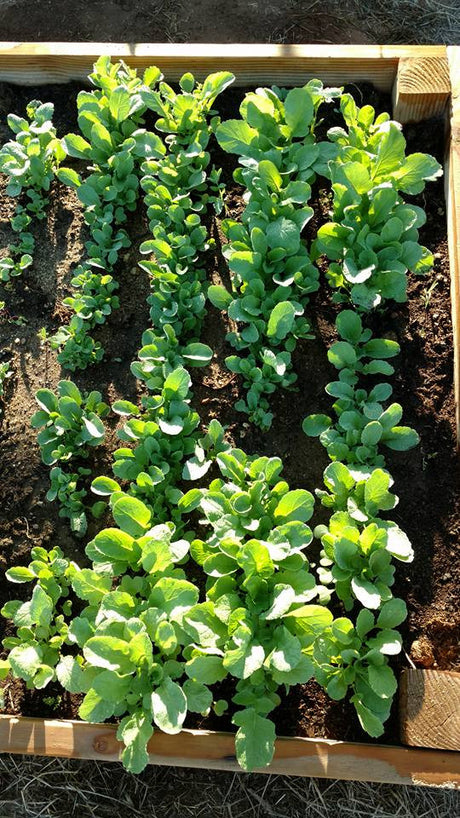
I love our raised bed gardens!!!  There are so many benefits such as less water usage, almost zero weeding and best of all, LOTS of food produced in a small space.

I've had so many questions about what to use for Garden Soil.  The thing is, you can ask all of the "experts" and there is no absolute "right" way.  No one way works for everyone so below you will find some of the recommended recipes for gardens beds.  You'll also find my own recommendations based on what has worked for me.

Vegetable plants need loose, free-draining soil with readily available nutrients to produce abundantly. Each year's crop takes a bit of the nutrient base of the soil with it, so this must be returned on an annual basis to keep the garden productive.  This means adding amendments every year to maintain a healthy balance of nutrients.

First, a caution for the thrifty.  Be wary of advertisements for cheap or free bulk topsoil, as this material is generally scraped from construction sites and may be full of roots and rocks, making it unsuitable planting vegetables. Go to the landscape supply yard and look at the options to make sure you are getting a loose, clean, lightweight material that has compost already mixed in.

If you are building and filling  multiple beds, buying bagged soil isn't economical.  Call around your area and ask for bulk organic topsoil.  You might not be able to find "organic" soil so you can always ask for untreated soil.

1 - 4 foot by 4 foot raised bed takes 16 cubic feet of soil or approx 1/2 a cubic yard of soil

I saw one recipe that called for 1/3 Peat moss, 1/3 vermiculite and 1/3 compost.

This is not a recipe I use.  First, peat moss is on the acidic side.  Coconut Coir is neutral and a more sustainable addition to your garden.  Next, too much vermiculite will keep your soil from retaining moisture and nutrients.

Here's another recipe I found:
  • 3 parts compost
  • 1 part peat moss 
  • 1 part vermiculite

Here's my all time favorite from Rodales:
You want the kind that’s dark, rich, and loaded with microorganisms. Fill your beds with a mix of 50 to 60 percent good-quality topsoil and 40 to 50 percent well-aged compost. Before each new growing season, test your soil for pH and nutrient content. You can buy a kit at most home-improvement stores. If your test shows a need for additional nutrients like nitrogen and potassium, raise levels by working in amendments such as bone meal and kelp. Dress beds with an additional ½ inch of compost later in the growing season to increase organic matter and boost soil health. 

I use my own version of the above recipe.  I add coconut coir to each bed.  Depending on what I'm planting, if it needs lighter soil I'll add a bit of vermiculite.  Most of our beds are fed with our own DIY Organic Liquid Fertilizer Mix

We've been building up our own compost and amending the topsoil we purchased by the truckload several years ago.  If you are just getting started, you might have to shop around for a healthy option.


http://www.facebook.com/pages/Marys-Heirloom-Seeds/229833070442449

Sign up for our E-Newsletter


Build Your Own Raised Beds and GROW! Posted on 31 Jan 13:22 , 9 comments

We're finally updating our Build Your Own Raised Bed tutorial!  Our first post was in 2015 when we moved to our new homestead and built a bunch of 8 foot by 4 foot beds.

We are STILL using these beds but we ended up putting gopher wire on the bottom to keep the gophers out.  We've also adapted this tutorial to make a few 4 foot by 4 foot beds for different projects or just because they were easier to handle.

Many of you have seen our updates on facebook.  We have expanded our growing area over the last week.  This place is HUGE!  We wanted to get growing fast but with the rocky ground (and gophers) at our new homestead, we decided to build raised beds.  Here's how we built...


Tools:
Drill (required)
Circular saw (optional)  
Staple Gun (optional) 

Lumber & Supplies:
We purchased 2"x12"x16' untreated boards
untreated 4"x4" posts-Buy it 8 feet long and have it cut in 1 foot long posts
48" landscaping cloth (optional)
 3" deck screws from a local hardware shop.
It takes 1 and a 1/2 boards to make these 4X8 beds.  
That means 12 boards will make 8 beds.


A few thing I've learned:
Landscaping cloth works to keep the weeds out but NOT gophers.

If you have gophers or other burrowing pests, I highly recommend gopher wire or hardware cloth (it's not actually cloth).  Affix the wire to the bottom of the bed after you build the bed but before you fill with dirt

The 3 inch deck screws can be expensive but they are well worth it

I was told that the 4" post at each corner was overkill but I feel it is worth it.  Our raised beds are in great shape so far!

If you choose to build 4 foot by 4 foot beds, you can purchase pre-cut boards OR buy 1- 2X12X16 and have it cut into 4 foot boards.

If you prefer to make smaller beds then you will need to re-adjust length/quantity of boards. 

Screws: 32 
3 inch "Star Drive" deck screws
*These include a drill bit* 
The 2"x12" board were cut in 4' and 8' pieces.   
The 4"x4" posts were cut in 12" pieces.
If you don't have a circular saw (or want to make the boards easier to handle) I suggest having the people at the shop cut your boards. 
The 12" pieces of 4x4 post were attached  
to the ends of the 2x12x8 pieces with the  
3" deck screws: *4 screws per board per corner* 
32 screws total


After taking the 4' and 8' boards to the garden the 4' and 8' boards were assembled so that the 4' boards covered the ends of the 8' boards with their attached posts. 


This gave the assembled bed a 4'x8' OUTSIDE dimension gopher wire was attached to the bottom

Now, we have pictures of our 4 foot by 4 foot beds!


4 ft by 4 ft bed


4 ft by 4 ft bed with gopher wire


We used a staple gun to attach the gopher wire to each bed
The assembled bed was then placed gopher-wire side down and filled with good, organic soil with plenty of Organic Nutrients added to the beds.

4 X 4 growing Organic Radish


For 4 beds @ 4ft X 8ft we used about
5 cubic yards of soil.
Water the bed once it's filled with dirt and organic plant food.  We added more dirt once the soil compacted a bit.
TIME TO PLANT HEIRLOOM SEEDS!

If you have additional questions about getting started or would like more info please feel free to ask.  As always, I am happy to help.

If you'd like to check out some of our gardening tips, check out our fb page. 

Stay tuned for info on FILLING and maintaining these beds!


http://www.facebook.com/pages/Marys-Heirloom-Seeds/229833070442449

Sign up for our E-Newsletter


BUILD YOUR OWN RAISED BEDS Posted on 1 Mar 14:42 , 1 comment

From our previous post in 2015
Did you see my post about Our New Homestead?
Then you know that our new place has LOTS of room to GROW!
We've installed 4 new raised beds and had 2 on the property when we arrived.
 
 
FEBRUARY 12, 2015
Many of you have seen our updates on facebook.  We have expanded our growing area over the last week.  This place is HUGE!
We wanted to get growing fast but with the rocky ground at our new homestead, we decided to build raised beds.  Here's how we built...
Tools:
Drill (required)
Circular saw (optional)  
Staple Gun (optional) 
Lumber:
We purchased 2"x12"x16' untreated boards, untreated 4"x4" posts, 48" landscaping cloth and 3" deck screws from a local hardware shop.
It takes 1 and a 1/2 boards to make these 4X8 beds.  That means 12 boards will make 8 beds.
If you prefer to make smaller beds then you will need to re-adjust length/quantity of boards. 
Screws: 32 
3 inch "Star Drive" deck screws
*These include a drill bit* 
The 2"x12" board were cut in 4' and 8' pieces.   
The 4"x4" posts were cut in 11.25" pieces.
If you don't have a circular saw (or want to make the boards easier to handle) I suggest having the people at the shop cut your boards. 
The 11.25" pieces of 4x4 post were attached  
to the ends of the 2x12x8 pieces with the  
3" deck screws. *4 screws per board per corner* 32 screws total


After taking the 4' and 8' boards to the garden the 4' and 8' boards were assembled so that the 4' boards covered the ends of the 8' boards with their attached posts.   
This gave the assembled bed a 4'x8' OUTSIDE dimension so the landscaping cloth could be attached to one side with staples


If you have gofers, you might consider laying down fine mesh wire (Gofer Wire) below your beds.  We used landscaping cloth or "weed blocker" since we laid the beds down on vegetation for the first few.
UPDATE: We realized that gophers were eating our veggies!!!  We learned our lesson and had to re-do all of the beds with Gopher Wire.
All of the weed blocker was removed.
We used a staple gun to attach the gopher wire to each bed
The assembled bed was then placed gopher-wire side down and filled with good, organic soil with plenty of Organic Nutrients added to the beds. 

For 4 beds @ 4ft X 8ft we used about
5 cubic yards of soil.
Water the bed once it's filled with dirt and organic plant food.  We added more dirt once the soil compacted a bit.
TIME TO PLANT HEIRLOOM SEEDS!
One of our Heirloom Tomato beds (approx 2 months)
If you have additional questions about getting started or would like more info please feel free to ask.  As always, I am happy to help.

If you'd like to check out some of our gardening tips, check out our fb page.

http://www.facebook.com/pages/Marys-Heirloom-Seeds/229833070442449

Or Sign up for our E-Newsletter